Why?

This blog is to help you in preparing for an emergency. It also contains other information that you might find spiritually up-lifting. This is not an official website of "The Church of Jesus Christ of Latter-day Saints". This site is maintained by Barry McCann (barry@mail.com)

Tuesday, January 24, 2017

Wilderness First Aid

One of the scariest things that can happen when you’re in the back-country is an injury. Even a small blister can upend a backpacking trip, but imagine facing something more serious, like a broken leg, an allergic reaction, or a burn from the campfire, and not knowing where to start. Suddenly it’s abundantly obvious that getting to a hospital isn’t as simple as calling 911, and you wonder where you packed the first-aid kit – you did pack a first-aid kit, right? Having a first-aid kit and knowing how to use it are important parts of making any trip to the back-country. Here are some tips to get you started in wilderness first aid.
Article and info graphic shared with us by Fix.com
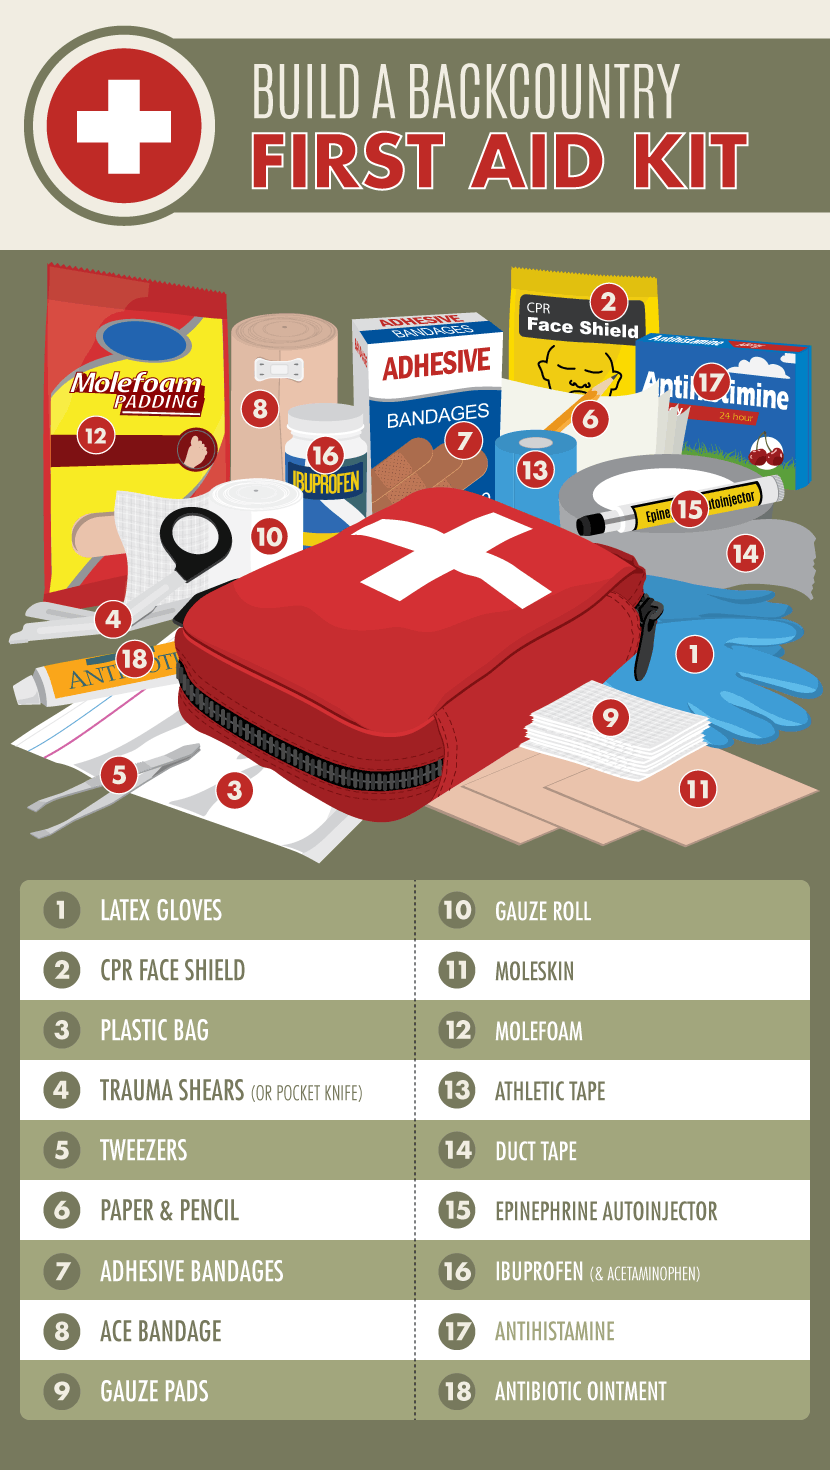
Backcountry First Aid Kit
Source: Fix.com Blog

Take a Course

If you plan on spending time in the backcountry, it’s important to take a course in wilderness medicine. You have three options when choosing a course.

Wilderness First Aid (2–3 days)

This course provides an overview of wilderness medicine, and it is designed for people who plan on taking mostly weekend trips. You’ll learn how to check for threats to life, how to care for wounds and fractures, and how to deal with an emergency in a deliberate way.

Wilderness First Responder (~10 days)

This course is usually required for people who want to work in the outdoors. The material is presented more thoroughly than the material in the short course, and the course covers a wider range of common wilderness injuries.

Wilderness EMT (one month)

If you want to be a ski instructor or expect to bounce between EMT work and time in the backcountry, this is a great option. In addition to the national EMT curriculum, the Wilderness EMT includes a component designed for providing remote care.
Don’t be intimidated by the fact that these are all classes; most wilderness medicine courses involve a lot of hands-on learning and scenarios, which provide plenty of chances to practice your skills. Be sure to take a class from a reputable program and keep your certification up to date. Most certifications have to be renewed every two to three years, and most of them include a CPR component. Renewing your certification may seem like a hassle, but it’s a great way to brush up on rusty skills and learn changes to the curriculum or protocols.

First-aid Kit

  • Gloves (2–3 pairs Latex or nitrile gloves are essential for anyone treating a patient; pack a few pairs so you won’t run out.
  • Band-Aids (10–20): These are great for small cuts and scrapes.
  • Ibuprofen and acetaminophen: Sometimes referred to as “Vitamin I,” ibuprofen is great for treating everything from headaches to aching feet.
  • Antihistamine and an EpiPen: Allergic reactions happen fast, so make sure you know where the EpiPen and Benadryl are located so you can retrieve them quickly.
  • Tweezers: Tweezers are great for removing splinters and ticks.
  • Moleskin (2 sheets): These are great for preventing and treating blisters.
  • Molefoam (1 sheet): Molefoam provides a fast way to pad a blister.
  • Athletic tape (1 roll): Athletic tape can be used for a number of injuries, including twisted ankles and blisters, and it can be used to tape gauze over larger wounds.
  • Duct tape: Instead of packing a roll, unwind some tape and wrap it around itself so you can remove pieces.
  • Gauze pads (2–3): These are perfect for burns and big cuts.
  • Gauze roll: Having two types of gauze may seem redundant, but the roll can be handy for wrapping any number of injuries.
  • Antibiotic ointment (3–5 packets): These come in small packets, which are a nice, lightweight option.
  • Ace bandage: These are bulky, but they are great for wrapping around splints if you’re dealing with a fracture or simply supporting a rolled ankle.
  • Trauma shears or a pocket knife: Scissors aren’t lightweight, but they are indispensible if you need to cut molefoam or remove clothing around an injury. If you opt to leave them behind, be sure to carry a pocket knife.
  • CPR face shield: This is a lightweight version of a CPR mask.
  • Paper and pencil: These are vital for recording information and taking notes on your patient.
  • Plastic bag: These are always useful, but if you’re disposing of biohazardous material, it’s especially important to have one in your kit.
Safety at the Scene
Source: Fix.com Blog
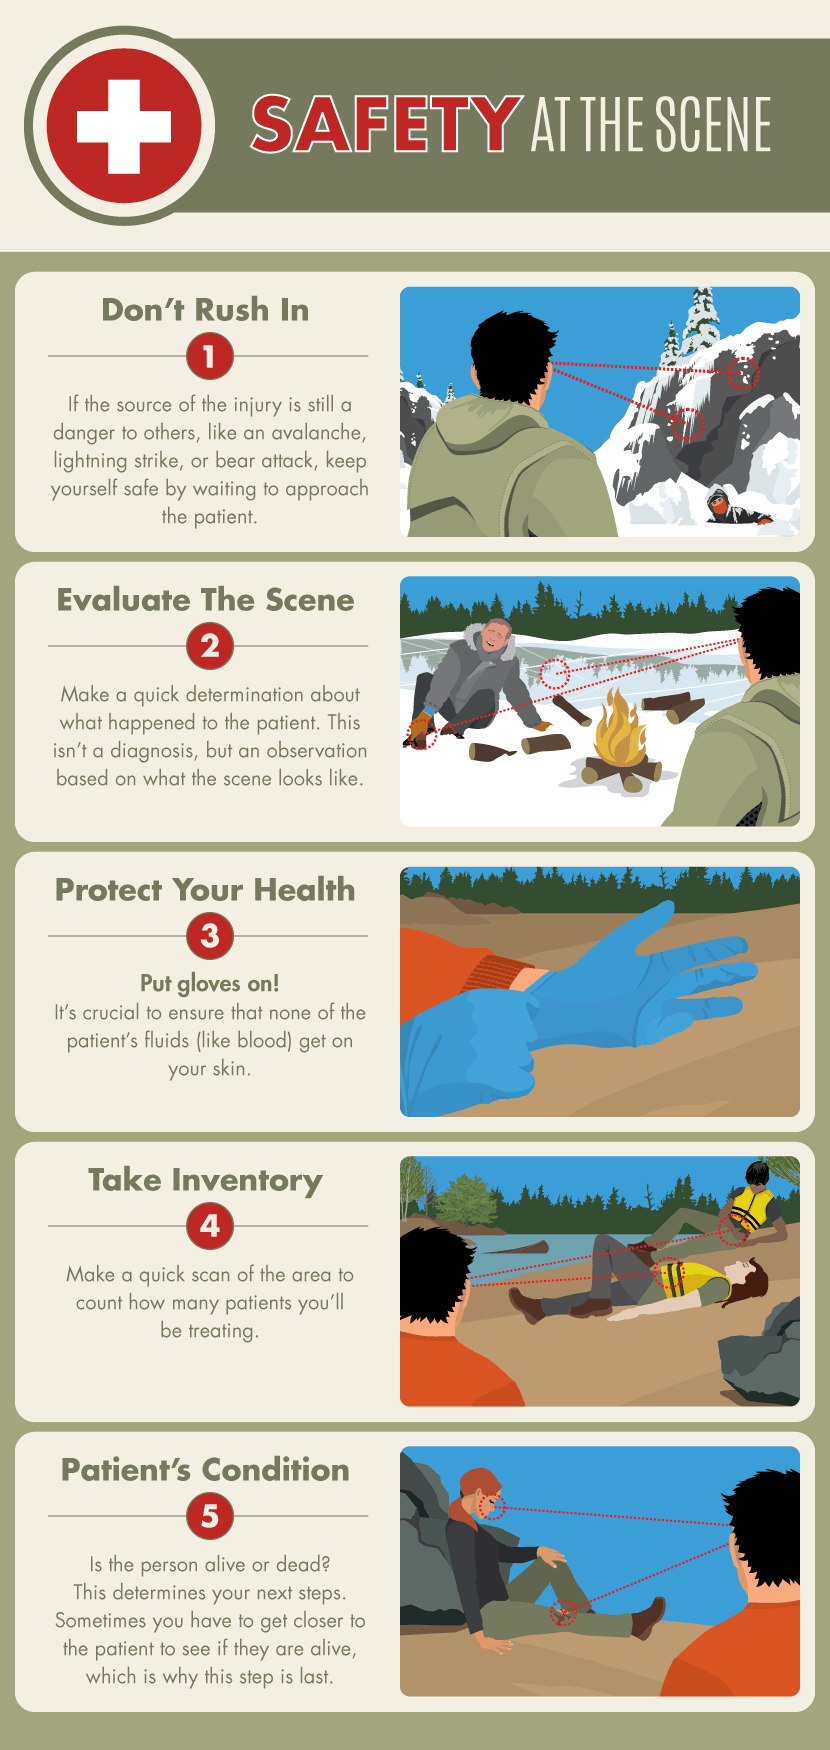
One of the first things you learn in first-aid training is how to assess a situation to ensure your own safety and that of potential victims. When someone gets injured, your instinct will be to rush to help, but it’s important to take a minute to size up the situation first. These five steps will help you quickly gather important information about the situation before you approach the injured party.
1. Make sure the area around the patient is safe for you, the rescuer. This may be a quick decision if the patient simply fell, but consider the scene after an avalanche, a lightning strike, or a bear attack. If the thing that caused the injury is still a danger to others, keep yourself safe by waiting to approach the patient. There’s no sense in creating more patients.
2. Make a quick determination about what happened to the patient. This isn’t a diagnosis but an observation based on what the scene looks like.
3. Put on gloves! It’s crucial to ensure that none of the patient’s fluids (like blood) get on your skin. Gloves are the easiest solution for protecting your hands, and you should wear them at all times while treating a patient.
4. Make a quick scan of the area to count how many patients you’ll be treating. Maybe you’ve stumbled upon a boating accident with a raft full of people, or maybe you’re hiking with a friend who stumbled and fell to the ground.
5. Is the person alive or dead? This may seem basic, but it will give you a lot of information about what your next steps will be and how fast to make them. Sometimes you have to get closer to the patient to see if they are alive, which is why this step is last.

First-aid 101: Blister Prevention

Blisters are a much more likely to occur on a hiking or camping trip than are some of the other incidental injuries a person may incur. Learning how to treat them is a valuable skill that will pay off in dividends. Blisters are essentially burns caused by friction, and they are incredibly common on backpacking trips, especially if you’re wearing brand-new boots. The pre-cursor to a blister is known as a “hot spot.” It’s best to catch blisters at this stage, when they’re easily treated.
If you or your hiking partner discovers a hot spot, stop and take a look at the foot. Hot spots are usually red, and they will be slightly painful to the touch. They’re caused by the foot rubbing against either the boot or the sock, so to treat them, you need to relieve the friction. This is easy to do with moleskin. Simply cut out a circular piece about the size of the hot spot and tape it in place (athletic tape works well for this).
Have the person remove their boot and sock. Take out a square of Molefoam and cut a circle that covers the entire blister, plus a little extra. Round pieces are best because they don’t have any corners, which will peel.
Once you have a circular piece cut, fold the piece in half and cut out the middle, creating a foam donut. The inside hole should be large enough that it covers the entire blister.
Place the foam donut over the blister. If the extends out further than the foam, make a second donut and place it on top of the first. The goal is to create a ring around the blister that will protect it from rubbing against the boot.
If the blister has popped, apply some antibiotic cream inside the donut. If it hasn’t popped, leave it intact. A popped blister is no longer protected by the cushion of the fluid, and it’s an easy access point for infection-causing bacteria. Once the blister is surrounded by the donut of foam, wrap the area with athletic tape to keep the bandage in place.
How to Treat a Blister
Source: Fix.com Blog
Now that you know some of the basics, sign up for a wilderness medicine class in your area. Start by checking these three schools that offer nationally recognized certifications.

Saturday, January 21, 2017

You are here: Home / Personal Safety / Survival Life’s Comprehensive Checklist For 72 Hour Survival Kit

Survival Life’s Comprehensive Checklist For 72 Hour Survival Kit

Survival Life’s Comprehensive Checklist For 72 Hour Survival Kit

Checklist For Your 72 Hour Survival Kit

Earthquake, hurricane, flood or another terrorist attack are perilous circumstances that we might not prevent from happening but we can always do something to survive its threatening consequences. Every time I’m engaged in a conversation about survival, the old adage “It’s better safe than sorry” flashes in my mind like a mighty lightning. Constantly reminding me that despair is the prize of an ill-prepared individual. So on that note, check out this comprehensive checklist for 72 hour survival kit. You can also personalize your kit to make it more suitable to your needs. Read. Learn. Survive.
Food and water


Food and water | Survival Life's Comprehensive Checklist For 72 Hour Survival Kit


Being safe also means taking good care of our health. In an event of a disaster where grocery and convenient stores are closed, it would always be advantageous to have food and water in our 72 hour survival kit. When SHTF and blows indiscriminately, you will be needing all the energy you muster just to get by. Here’s a list of some of the food that you can include in your kit:
  • canned meat, fish, and beans (“pop-top” cans that open without a can-opener is a sound idea)
  • canned juice
  • trail mix or dried fruit
  • crackers and cereals
  • protein or granola bars
  • water (3 gallons per person)

Bedding and clothing


Bedding and clothing | Survival Life's Comprehensive Checklist For 72 Hour Survival Kit


Every kit should have a complete outfit of suitable clothing for every family member. Never disregard the benefits of having some protective clothing in your kit especially in the midst of a severe weather condition. Include these items below in your kit:
  • Wool-blended blanket and Emergency heat and reflective blanket
  • Sleeping bag and sleeping pads
  • Extra Clothing (short and long sleeved shirts, pants, jackets, socks, etc.)
  • Undergarments
  • Rain coat or poncho

Personal supplies and medication


Personal supplies and medication | Survival Life's Comprehensive Checklist For 72 Hour Survival Kit


Having a first aid kit in your pack should not be an option rather it is a must. In an emergency situation and someone is wounded, administering first aid can reduce the severity of the injury and the risk of infection. Non-prescription medication should also be included to treat fever and body aches. And of course, we shouldn’t neglect the importance of hygiene and sanitation when we’re talking about survival for sickness and disease will exceedingly lower your chances of getting out alive and well out of a perilous circumstance. Don’t forget to include the items below in your survival kit:
  • First aid kit and supplies (ointments, gauze pads, assortment of bandages, cold/hot packs, scissors, and tweezers)
  • Toiletries (toilet papers, moist towelettes or baby wipes, feminine hygiene, toothbrush, etc.)
  • Cleaning Supplies (sanitizers, soap, shampoo, dish soap, etc.)
  • Medication ( Acetaminophen, Ibuprofen, children’s medication etc.)
  • 3-day supply of prescription medication

Equipment


Equipment | Survival Life's Comprehensive Checklist For 72 Hour Survival Kit


The items listed below are important components of your 72 hour survival kit. These things will serve as your dependable protector in a survival situation and will definitely make your task a lot easier. Just make sure that they are durable enough to withstand even in the midst of an unrelenting weather condition.
  • basic tools (wrench, pliers, shovel, hatchet or ax, pocket knife, etc.)
  • can opener
  • dishes and utensils
  • camp stove and fuel
  • rope
  • duct tape
  • whistle with neck cord
  • cell phone charger
  • dusk masks
  • hand operated or crank radio with spare batteries
  • pen and paper

Light and firestarters


Light and firestarters | Survival Life's Comprehensive Checklist For 72 Hour Survival Kit


When we are confronted by a natural disaster such as an earthquake or a typhoon, power outages are inevitable. And it’s absolutely difficult to maneuver in the dark. So these items below will undoubtedly guide you out of harm’s way.
  • flashlights/lamps
  • extra batteries
  • long burning candles
  • flares
  • lighters
  • windproof/waterproof matches

Personal documents and extra cash


Personal documents and extra cash | Survival Life's Comprehensive Checklist For 72 Hour Survival Kit


Include your legal documents in your 72 hour survival kit. One of the most neglected areas in preparedness is having your important documents with you. This will prove your identity and possessions to authorities in time of a survival circumstance. Let us not forget what Katrina thought us. To guard against looting, a lot of families were prevented by the national guards and police from entering their homes unless they can present identification and evidence of ownership. Place these documents along with some extra cash in a waterproof container.
  • legal documents (birth/marriage certificates, contracts, passports, will, etc.)
  • insurance policies
  • copies of your emergency plan and contact info
  • credit cards
  • prepaid phone cards
  • cash (include small bill and quarters for phone calls)

Ready-to-go kit


Ready-to-go kit | Survival Life's Comprehensive Checklist For 72 Hour Survival Kit


In the event that you need to bug out or evacuate your premises, keep your ready-to-go kit items in a duffle bag or in your backpack and place it in an accessible place such as a front-hall closet. Make sure you can lift and carry it.
  • non-perishable food
  • water ( 3-4 liters per person)
  • extra clothes
  • first aid kit
  • flashlight and extra batteries
  • prescription and non-prescription medication
  • personal hygiene items
  • a card with emergency contacts
  • protective weapon (if available)

Important Notes

  • You need to update your kits every six months. Make a note in your calendar or planner to make sure that water, food, and medication are not yet expired, see to it that the clothing still fits, personal documents are up to date and batteries are well charged.
  • Divide your items into groups and put them in individual Ziploc bags because some items might leak, melt or break open.
  • Adjust clothing for winter or summer needs
  • Consider the needs of other family members such as the elderlies and the babies.

Thursday, January 19, 2017

Dirt Cheap Survival Recipes

Many preppers conclude the economy in the U.S. will collapse gradually, rather than overnight due to some cataclysmic event. Either way, your ability to find and secure meals for you and your family becomes the difference between life and death for your family. So, how do you prepare to survive in a world where food is scarce, and money is tight?
Following a SHTF event, the only certainty will be unpredictability. Depending on the event, your location, and how long it takes for the country to recover your options for cooking and food storage will change. Practice making a variety of different cheap survival recipes so that no matter what type of situation you find yourself in, you are ready to put a meal together that will satisfy your family. Below are several different ideas for your survival meal arsenal:
Chicken livers come in a carton and cost around $1.00. Boil with salt and pepper in either water or chicken broth. The beneficial thing about chicken livers is just a small amount with some whole grain bread, and a cup of milk will stave off hunger for several hours.
Pouches of instant potatoes are relatively inexpensive, typically under $1.00 at the local Walmart. Ramen Noodles are another very inexpensive food; you can buy six to 12 packages for under $2.00. Both are simple to cook as they require only boiling water. For variety, mix the instant potatoes with the ramen noodles to create a high- energy food called “ramen-bombs.”
Pasta is a great food staple to have on hand, and it can be used to create a variety of meals. Cook pasta and drain. Fry several eggs over medium and sprinkle with salt and pepper if you have it. Combine the eggs with the pasta and throw in cooked veggies, cheese, or meat. You can also mix cooked pasta with any salad dressing on hand and add fresh vegetables for a great pasta salad that will fill you up.
DIY Survival Recipes
If you are lucky and are thinking ahead, you will have the time and resources to create dirt cheap survival recipes to have on hand when SHTF. Sometimes, survival is about preparing to think or in this case, cook, outside the box.
You’ve probably made toast in a toaster at some point in your lifetime, but have you ever thought to try grilled bread? Use your barbecue grill or even a campfire with a grate. Grill the bread till it’s golden brown. And if you have cheese on hand, you can melt it between two pieces of bread and make a really tasty grilled cheese sandwich.
If you correctly store cornbread mix, you can make delicious johnnycakes or cornmeal hoe cakes in a skillet of cast iron over a campfire or even on the hot rocks of a fire. Add some syrup or sprinkle with sugar for an extra treat. If you must stay on the go, put leftovers in a zip lock bag so you can carry them with you as a snack on the road.
Native Americans relocated their camp several times a year as they followed the animal herds. They carried Pimikan, typically made from dried powdered meat such as elk, bison, moose, or deer, it was a portable food adopted by fur traders in later centuries who called it. Pemmican. Practice making this cheap survival food and add it to your stockpile. It needs no refrigeration and when properly made, can last for decades.
Include corn in your garden, or in a pinch scavenge ears of corn from a roadside field, wrap in aluminum foil with some butter and cook in the coals of a fire. If you prefer a grilled taste, soak ears of corn in water and cook on a grate over the fire to grill it. You can cook with the husks on or remove before cooking depending on your preference.
Stock up on those Pillsbury cinnamon rolls or biscuits in a can. When the power goes out, simply wrap the dough around a stick, and pinch the ends so that it won’t fall off. Hold the stick over your BBQ grill or campfire until the dough is a golden brown. Slather with butter and enjoy a tasty treat that you can carry as you eat it.
Include heavy duty aluminum foil in your stockpile of supplies. When SHTF, lay out a large section of foil and add chunks of potatoes, onions, or whatever vegetables you have on hand. Top with a chunk of butter and a little salt and pepper and then wrap it all up and cook over hot coals or the BBQ grill.
When SHTF, you may have food available that you can cook but will need to think outside the box a little when it comes to cooking without your traditional stove or oven. Planning ahead and knowing how to make some of these cheap survival recipes will help sustain you and your family whether you bug in or are forced to bug out.

Alternative Backcountry Food Options


Tuesday, January 17, 2017

7 Best Bow Hunting Tips

In order to be a great bow hunter, you’ll have to go through years of training and experience. It’s just like playing a musical instrument; at first, you don’t know what you’re doing, but with a lot of practice and determination, you’ll find yourself playing sonatas. It’s just the same with archery and bow hunting, but sometimes, you can’t improve by yourself. Thus, I’ve put together this article on bow hunting tips for all beginner hunters. Enjoy!
Weigh between speed and accuracy
Sometimes, you have to choose between the two. And as a beginner bow hunter, you’re bound to have trouble accomplishing a shot with both. Personally, I recommend practicing accuracy first. You’ll need to be more experienced with hitting a target dead on that hitting it at a fast rate.
On the other hand, speed is something that comes naturally (at least for me). I’d say speed will come when accuracy is improved. In other words, once you start hitting those bulls-eyes dead on, your speed is bound to improve as your confidence increases as well. Vice versa, speed will help your accuracy, as faster arrows bound to fly straight at the target.
For beginners, it’s important to master both. But not necessarily at the same time. When you’re out hunting, however, accuracy is more important, but speed weighs in a good amount, as well.
Pick a bow and stick with it
When it comes to archery and bow hunting, mastering your weapon is the best way towards experience. Choosing the right bow is a little bit of trial and error, so I don’t blame you for switching between bows. However, keep this in mind: the right bow will just feel right in your hands, and you’ll know when you have it. Under this, we consider weight of the bow, style, design, length, and these factors relative to your own dimensions and preferences.
If you do, however, find a bow that you can stick with, I highly suggest that you do so. Mastering your weapon will make your bow more of an invaluable friend than a hunting tool, and shooting an arrow will feel like a second instinct.
Generally, the more you master your bow and practice with it, I’d say that your accuracy and precision will improve as well. This is especially important if your target is to go bow hunting soon.
Work tirelessly on your form
The better the form, the higher the accuracy, speed, and precision of your shots. Find and practice the right form, with the proper stance, torso position, and grip relative to the target.
On this matter, I recommend asking an experienced bow hunter or bow hunting expert to assess your form. Ask for an evaluation afterward, which you can use to point out the things you need to do right/better. It also helps to watch Youtube videos wherein you can see bow hunters demonstrating a proper form.
Tip: practice in front of a mirror and compare your stance, torso position, and grip to a standard.
Practice in different settings
Actual bow hunting entails practice shooting in different situations and settings. For instance, you need to know how to keep your bow straight on a windy day, as much as you need to know how to shoot in low light.
It’s best if you practice when the weather is not that good, maybe a little windy. That way, you get to practice your aim in the wind. Another example is practicing near sunset, which will allow you to train with your bow sight in low light settings.
The trick here is to set yourself in a little diversity. After all, you never know what you’re going to expect in the wilderness.
Study, study, study
Reading goes a long way. When you’re a beginner bow hunter, it immensely helps if you read on your niche. Deer hunting tips, bow sight usage, accuracy and precision tips—all of these stored in your mind can help you apply them on the field and in practice.
Also, I emphasize the importance on reading about survival tips. These are the bits of information that you need stored at the back of your head at all times, especially in risky hunting situations and seasons.

Invest in high-quality equipment
When I was a beginner hunter, I wore all the wrong things and hated myself while freezing on the field. So, take it from me and choose the right equipment and clothing to take with you on your hunting trips.


My major recommendation is to splurge a bit—on your first pair of hunting boots or hunting knife, for example, because these are practical investments. When you choose the right products, you will get the quality that you paid for.
Choosing the right equipment also goes for hunting backpacks, kits, knives, clothes, and other gear that you take on a hunting trip. As a beginner, you tend to be not used to the wilderness and discomfort can come creeping up on you unexpectedly. So, choosing the right type of equipment can get you a long way.
Practice being stealthy
When you’re a bow hunter, you have the advantage of silence unlike gun users. When hunting skittish animals like deer, most especially, it helps a great deal if you know how to carry yourself, stalk, and shoot the target in a stealthy mode altogether.
For beginners, it may be a little hard controlling your footsteps and movement in order to make the noise as minimal as possible. It’s also a bit challenging to master the way on how to carry yourself and stalk your prey effectively. However, this skill can be learned just like any other.
The key is to practice in the field. You may not succeed on the first tries, but experience is the best teacher when it comes to stealth. Just make sure to take note of your mistakes and think of ways on how you can improve them afterward.
Under stealth, you also need to learn how to be unseen. This includes masking your scent against the sensitive noses of deer and bears, as well as wearing the right color of clothing. On this matter, you can read up on tips on how to do that and apply it the next time you go buck or bear hunting.
Conclusion:
We all start somewhere, and in bow hunting, it takes more than just a little bit of practice to master your weapon and shred in the field. This article is meant to open you up to the basics of bow hunting, which are useful if you want to learn fast in this area. To conclude, I give you this quick rundown of our tips to remember:
  • Practice both your accuracy and your speed, with accuracy as your priority. Speed will follow soon after
  • Stick with one weapon if it feels right, then master it
  • Work on your form tirelessly
  • Practice shooting in different situations and settings (e.g. low light, windy, high up on a tree stand)
  • Study on the field of bow hunting to find all the best tips and basic information you need to know
  • Invest in high-quality weapons and equipment
  • Acquire and practice the skill of stealth

Sunday, January 15, 2017

How Concealed Carry Policies Can Keep You and Your Employees Safe

Unfortunately, in today’s society, there are times you may be confronted with violence at work, as illustrated by incidents such as the on-air shooting of reporter Alison Parker and photojournalist Adam Ward, the San Bernardino shooting and the Orlando nightclub shooting. An average of 551 workers a year are killed as a result of workplace-related homicides, according to the latest data available from the Bureau of Labor Statistics. In 2010, 78 percent of these homicides involved shootings. The risk of being shot at work raises the question of how concealed carry policy should be applied in the workplace. While gun control advocates may reject the idea that concealed carry has a place at work, preppers know that concealed carry may be your best defense against a disgruntled and armed employee or customer. If you’re considering implementing a concealed carry policy at your workplace, here are some guidelines for pursuing your policy safely.

Check Your State Laws

The first thing to do is check your state laws in consultation with your company’s legal team, since laws regarding concealed carry and an employer’s legal right to determine concealed carry policy vary by state. State laws seek to balance a citizen’s constitutional right to bear arms with an employer’s right to control policy on private property and their responsibility under OHSA to maintain a safe workplace environment. Some states prohibit retaliation against gun owners for bearing arms and limit an employer’s right to search employee vehicles. Others allow an employer to prohibit guns if they post certain notices.
As of June 2015, employers in Maryland were allowed to restrict concealed carry in parking lots and on premises, while those in California were not, and those in Florida were allowed to restrict concealed carry on premises but not in parking lots. Some states also allow exceptions to these rules. For instance, Utah allows employers to restrict concealed carry in parking lots and on premises, but there is an exception for federal and state workers.
Check to see what legal options are available to you under your state laws for determining your company concealed carry policy. Knowing your state’s laws can help you in formulating your policy by letting you know what options are legally excluded.

Consider Your Corporate Culture

Beyond legal considerations, your concealed carry policy towards your employees can also impact your brand reputation with your customers, points out the Society for Human Resource Management. One key issue that impacts your brand is whether the same policy you apply to your employees also applies to your customers. For instance, Starbucks has drawn criticism for asking customers not to bring guns into their stores even if they have a concealed carry permit. Similarly, businesses can draw criticism for restricting self-defense rights of employees.
Apart from concerns about criticism, there is the more fundamental issue of how your gun policy aligns with your corporate culture. How do your company’s vision, values and mission statement inform your gun policy? For instance, consider your company’s overall policy toward your employees and customers, and develop a gun policy that embodies this stance, communicating how allowing concealed carry advances the safety and well-being of your employees and customers.

Who Can Conceal Carry Guns?

The question of whether your gun policy towards your employees extends to your customers broaches the broader question of who can carry guns under your corporate policy. What about part-time employees? Independent contractors? Hired security personnel? Visitors? Are any categories of workers required to undergo any type of safety training to be allowed to carry guns at your business? Will you run any background checks on employees and contractors who may be carrying guns to ensure that you meet OHSA standards for maintaining a safe working environment? Also consider how you will handle employees who have been recently terminated or otherwise involved in workplace confrontations and may have guns on their person or in their vehicles as they are exiting the building in a bad mood.

Where Are Guns Allowed?

Another issue your policy should address is where guns are allowed. As noted, some states have different restrictions for parking lots and premises. Additionally, there may be areas of your premises that are not entirely owned by you and may be shared with adjacent businesses. Within the legal guidelines of your state laws, you should develop policies that clarify what is allowed in each of the areas of your workplace. This will enable you to respond to employees who ask where they can store their guns.

What Kind of Guns are Allowed?

Another question to consider is what kinds of guns and gun supplies are allowed, suggests workplace law firm Fisher Phillips. For instance, definitions of “assault weapons” vary from state to state, which has contributed to media and public confusion over this term. Clarifying what types of weapons fall under your gun policy can help you if you become embroiled in a public relations battle over an incident at your workplace. Likewise, you may want your policy to clarify your stance towards semi-automatic versus automatic weapons. If deer hunting is popular in your area, you might also want to lay out a policy for rifles. Similar considerations hold for ammunition and accessories for different categories of weapons that fall under your policy.

What about Other Weapons and Dangerous Objects?

Some company gun policies also address the use of other weapons and potential weapons. For instance, knives can be classified as weapons in some contexts, but if your business is a restaurant, you obviously need certain types of knives to operate. Other objects such as boxcutters are not designed as weapons but can be used as such. You may wish to consider how your gun policy addresses these.

Friday, January 13, 2017

Grow Food in One Container All Year

Growing your own fruit and veg is a pursuit that is packed with advantages. Before you even eat the things, the action of nurturing these plants can be calming for the heart and soul, and offer a healthy sense of pride. Then there’s the nutritional benefits: knowing precisely what (if any) fertilizers and pesticides are on your veg, picking and eating them when they are perfectly ripe, and — if you have the room to grow them — you’ll probably end up eating more greens than usual. Even if you don’t have the room to grow food, it’s still possible to acknowledge your inner agriculturalist by maintaining a limited amount of seasonally appropriate produce in just one rotated pot.
With a good-sized pot (at least 45cm deep and wide), good compost and some trusty bamboo, you can soon master the hobby. The right watering patterns, fertilizer treatment and placement will vary from crop to crop. As the seasons turn and you switch one vegetable for the next, you will find that the transition process is also nuanced but achievable — great if you want to challenge yourself, or get the kids’ green fingers working.
To get started, try referring to this new info graphic which makes clear how simple this most natural of hobbies can be, and it won’t be long before you’re enjoying a rich and varied vegetable diet from just that one unassuming container. Bon appétit!
Info Graphic provided by Pound Place for your educational purposes.

Wednesday, January 11, 2017

Natural Disaster Emergency Preparedness

Emergency, like natural calamities such as flood, typhoon or hurricane, and earthquakes are a dangerous situation, requiring an immediate and fast response to avoid unwanted results ̶ injuries or death. Being able to make sure that you are safe before, during, and after any disaster is needed to counteract or respond effectively. What is needed is preparedness. According to the Federal Emergency Management Agency in the U.S., it means a continuous cycle of planning, organizing, training, equipping, exercising, evaluating and taking corrective actions in an effort to ensure effective coordination during incident response. Emergency Preparedness can save your lie or your loved ones lives.
Now, that sounds really intimidating. But we cannot just depend on all, everything, every time to the government agencies for security and emergency, or a non-profit charity organization such as Red Cross. We too must take our part, be on a mission to help ourselves during these times.

 Nothing beats Planning and Preparation

  1. Discuss within the household the type of emergency and how to respond to them, that may occur where you live, work, and your children (if any) attend to school and play. Include in it the roles and responsibilities of each member and how everybody will work together as a team.
  2. Take a Drill. These agencies have for sure guidelines for families on how to prepare before and during an emergency that is short on time but essential. Here is some few advice from them:
  3. Get a Kit. Purchase an emergency preparedness kit.
  4. Discuss on the Kit Rules. Make sure that every member in the household knows where it is placed aside in the house and that is to be used for emergency only. Also, identify the uses of each item inside the kit. You may personalize the Kit also. You can add canned foods and other personal items in the kit. Below are the following items that should be available in your kit.
At a minimum, you should have the basic supplies listed below:
Consider also the needs of all family members and add supplies to your kit. Suggested items to help meet additional needs are:
  • Medical supplies (hearing aids with extra batteries, glasses, contact lenses, syringes, etc)
  • Baby supplies (bottles, formula, baby food, diapers)
  • Games (toys) and activities for children
  • Pet supplies (collar, leash, ID, food, carrier, bowl) – for those with pets
  • Extra set (back-up) of car keys and house key
  • Matches or lighter
  • Rain Gear
  • Towels
  1. Make an Evacuation Plan. Have your own map and determine two or three destinations of evacuation areas and routes to go there. In your map, it is recommended to highlight them for an easier look at the event of the emergency.
  2. Be informed. Information is essential, especially on a calamity hitting your area. Right at the beginning, knowing what natural disasters may or can affect your location and what to do helps to you keep heads up of the possible scenarios during the disaster. It is already recommended to stay updated on the weather forecast news if a typhoon or hurricane may hit your area. Follow the advice of local authorities if they are telling you to evacuate.
  3. If away from home, ensure you know the hotline numbers, if possible write it down and have each member in the household has their own copies. Ensure that you have the contact numbers of the people close to you, like family.  They must know how to reach you and you know how to reach them.

 Keep it current and keep it with you. Information may include:

  • Emergency hotlines, like 911
  • Local Government Emergency and Safety Unit (hotlines and trunk lines)
  • Local RED CROSS hotline
  • Family phone numbers
  • An out-of-town contact (a close relative, friend) – Name and phone or mobile numbers
  • Common family emergency meeting place or evacuation area
  1. Learning Hands-Only CPR. This skill is absolutely necessary. You can save a life from a cardiac arrest. Furthermore, also consider learning skills on First Aid.
  2. Get connected. Keeping your data and devices available will keep you connected to the social media world, and post status updates (needed) on the current happening in your area or situation during the emergency. On the verge of no electricity, keep at reach your power banks, loaded enough to get you throughout the day/s so that when batteries of your smartphones are empty, it is there ready to back you up.

For the First Aid Kit

It is equally important to know how to treat minor injuries and how it can make a difference in an emergency. Below are the following items should be available in your kit:
  • Two pairs of Latex or other sterile gloves
  • Sterile dressings to stop bleeding
  • Cleansing agent/soap and antibiotic towels
  • Antibiotic ointment
  • Burn ointment
  • Adhesive bandages in a variety of sizes
  • Eye wash solution to flush the eyes or as general decontaminate
  • Thermometer
  • Prescription medications you take every day such as insulin, heart medicine, and asthma inhalers.
  • Prescribed medical supplies such as glucose and blood pressure monitoring equipment and supplies

Non-prescription drugs:

  • Aspirin or non-aspirin pain reliever
  • Anti-diarrhea medication
  • Antacid
  • Laxative

Other first aid supplies for Emergency Preparedness:

  • Scissors
  • Tweezers
  • Tube of petroleum jelly or another lubricant
  • Oil Liniments
Having and knowing all these guidelines on emergency preparedness, it is an important reminder that we need to be ready to respond to natural or even man-made disasters ̶ always. Because disaster can strike at any time of the day, so it’s important to have a planned response whenever we are at work, on vacation or on the road.