Why?

This blog is to help you in preparing for an emergency. It also contains other information that you might find spiritually up-lifting. This is not an official website of "The Church of Jesus Christ of Latter-day Saints". This site is maintained by Barry McCann (barry@mail.com)

Thursday, February 12, 2015

How To Make Your Own Bar Soap

Soap making is a great “self-reliance” skill that enables a person provide something for themselves that they would otherwise have to depend on a store to get.   
Homemade Soap and Emergency Preparedness
Making soap is one of those old skills that used to be really common and now is nearly unheard of.  If soap makers are ever again needed, learning it would give you a valuable skill that could help your family and community.
However, for prepping purposes I prefer keeping a stock of ‘pre-made’ ready-to-use soap or even store bought soap rather than prepping ‘soap making supplies’ (click here for Five Great Soaps to Prep).  While I always have a good supply on hand, soap making fats and oils do not store well, so it is difficult to keep them for longer than a few years.
The only exception I make to this is lye, I stock plenty of lye as it consumes time and fuel to make.  I am not aware of a shelf-life on lye, and have personally used lye that was nearly 20 years old.  The store bought version is inexpensive, and has many uses – this makes it very easy for me to prep.
Soap Making Facts
Soap is actually a salt (source).  It’s the result of a chemical reaction between fat (an acid) and lye (sodium hydroxide (NaOH) or  potassium hydroxide (KOH) a base. Lye is also commercially sold as a plumbing solvent for clogged drains and is also used to preserve food like in the Norwegian dish lutefisk. Lye is not a scary man-made chemical, it occurs in nature and with a little knowledge can be handled very safely.
IMG_5536

Soap cannot be made without lye.  It is possible to create a cleansing substance without lye, but it will not be soap.  Sodium hydroxide is often used to make solid soap while potassium hydroxide is usually used to make softer soaps and liquid soap.  For this article we will be using sodium hydroxide (NaOH) for a harder bar of soap.
The amount of lye needed to react with the fats and oils will vary depending on the chemical makeup of the fats and oils you are using.  This is why it is important to use an established soap recipes or a lye calculator, when you make soap.  A cup of olive oil may not need as much lye as the same amount of  a different type of oil, so if  you swap oils on the recipe you may end up with too much or too little lye. Too much lye means the soap will be caustic (capable of burning, corroding, or destroying living tissue) too little lye means the soap will contain too much fat, which will go rancid in time.
Cold Processed Soap vs Hot Processed Soap
Cold-processed soap still requires some heat but not much.  This soap making process requires exact measurements of lye and fat amounts and computing their ratio, using saponification charts or a lye calculator.  With cold processed soap, the bulk of the saponification happens after the combined oil and lye solution is poured into molds, usually over a period of two to six weeks. Because of this, cold processed soap still contains glycerine which is generally considered good for human skin.
Hot-processed soaps are created by encouraging the saponification reaction by adding heat to speed up the reaction. Unlike cold-processed soap, in hot-processed soap, the oils are completely saponified by the end of the handling period.  Therefore hot processed soap is ready to use right away.  In the “fully boiled hot-process” technique the glycerine and most of the impurities in the fat, lye, and water (which gives cold pressed soap its color) are completely cooked out of the soap and drained off as a liquid to be repurposed, leaving a pure hard white bar.
For the purposes of this article I will go over cold processed soap. But you can click here to learn more about each process.

Equipment List
  • IMG_5537Scale that weighs in pounds and ounces (digital is preferred in soap making for precision but a manual scale will also work)
  • One large stainless steel or enamel pot (do not use aluminum for soap making, aluminum is reactive)
  • One large stainless steel or enamel bowl (use this if you are splitting a batch for different scents or colors)
  • Hand stick blender (you can stir by hand if you want, it just takes more time)
  • Plastic measuring cup (for weighing out your oils and anything else)
  • IMG_5543Two cooking thermometers that must read over 100 degrees
  • Two wooden or plastic spoons (if using wood or plastic, here on after, use this equipment ONLY for soap making)
  • Rubber gloves
  • Safety goggles
  • Clear half gallon plastic container – like a juice pitcher
  • Soap mold (a couple of cardboard boxes lined with freezer paper, chunks of PCV pipe, or a clean kitty litter box will also work as a mold)
  • Old bath towel 
  • Rubber spatula (for scraping the pot and/or bowl after pouring)
There are many different types of soap; like goats milk soap, pine tar soap, castile soap, and coffee soap, but I will cover those in future articles.  Once the equipment is obtained and the process is learned these new types of soaps will be fun and easy.  For this article I will include two simple recipes (below) the instructions are universal and can be applied to most cold pressed soap recipes.
Simple Cold Processed Soap
This recipe will make 25-30 nice bars of soap that will be kind to your skin, that you could gift to friends and family.  The lye is discounted at 7% (this means there is more fat in the recipe than the lye can convert to soap, the extra fat is good for your skin).  You can make it as fancy or as simple as you want and it stores really well.  I recommend that people learn how to make soap with this recipe then move on to other recipes that may peak their interests. 
IMG_5549
First gather your equipment and pre-measured ingredients.  Wear a long sleeved shirt, rubber gloves, eye protection, keep your hair pulled back and wear shoes. Keep some vinegar nearby, so that if you get some lye on you (it will start to itch before it burns) you can treat it. Wash with plenty of soap and running water *first* and then rinse with vinegar.  Same with surfaces, wash and rinse in case of spills then spray with vinegar and then repeat when you are finished making soap.  If you get some on your clothes, immediately throw them in the washer.
  • 32oz Cold Water
  • 12oz Powdered Lye – pure sodium hydroxide (NaOH)
Add 32oz of water to the plastic container.  In a well ventilated area slowly add the lye into the water, stir gently trying not to splash. Never the other way around – you will get a violent volcano reaction.  Always add lye to water.  Set aside with one of the thermometers to cool to around 100° F – this could take several hours, to speed the process along set pitcher in an ice water bath or on a cold cement floor.  If the lye has cooled too much vigorously stir the mixture, this will heat it back up.
IMG_5551
In the large stainless steel or enamel stock pot add following solids, then place over medium-low heat on the stove until all are liquified:
  •  24 oz Coconut Oil (coconut oil gives soap its bubbles and gives hardness to the bar, this is why most soap makers will tell you that bubbles to do not necessarily equal cleaning power).
  • 28 oz White Shortening (Crisco will work)
  • 10 oz Rendered Bacon Grease, or Rendered Tallow (click here to see How to Make Your Own Tallow)unsalted butter will also work.  I don’t do vegetarian soap, I live on a farmstead so I use animal fat in all my soaps.
Remove melted solids from heat (from here on out you are done with the stove, turn it off). Check your lye water temperature.
This will start lowering the fat temperature, you want  it at 100° F as well (you can combine lye water and the oils anywhere between 125°F -100°F as long as they are the same temp or within 4 degrees of each other). Use the other cooking thermometer to check the temp. Once the temperature of the lye water and oils are the same, slowly stir the lye water into the melted fats and oils. Watch as the mixture begins to change color, get cloudy and thicken as the chemical reaction starts.  You just made soap!
IMG_5554

Stir the soap for 10 minutes, then let it rest for 15 minutes, set a timer if you need reminding.  Some people say to stir continuously, I have found this has no effect on how fast the soap finishes, so you might as well do something else for 15-20 minutes.  Continue on this way until a thin layer of oil remains and the surface thickens to the point where you can see a trail where you just stirred (see picture below). This is called “trace,” and it indicates that the soap is ready to be finished.

IMG_5575
 Hand stirred soap can take several hours to achieve “trace,” to speed things along use a stick blender.  Be sure to run the blender for a few minutes and then let it rest.  Their cheap little motors will burn up if they are run continuously.  Don’t lift the bender above the liquid level, doing so will mix in a bunch of air into your soap.  Trace can be achieved in as little as 5-10 minutes using a stick blender, but it can take longer.
  • Add 3 oz of any desired essential oils, or any colorants and desired botanicals (like corn meal or oats for scrubbing power) an mix well at this point.
Finishing the Soap
Stir thoroughly, then pour into molds. Almost anything can be used as a mold, shoe boxes can be used for soap molds, wrap in wax paper or butcher paper to prevent sticking. If the mold does not have a lid, place a piece of butcher paper over top of the soap.  This will help prevent soda ash from forming on the soap.  Wrap with the towel, and place in an undisturbed dark area for 24 hours.  Do not check on it.  Leave it alone.  After 24 hours remove the towel and let it sit for *another* 12 hours.

IMG_5534
IMG_5579

Cutting the Soap
After that point it should be a nice block of soap that you can pop out of the mold.  Continue to wear gloves, at this point the soap is still caustic.  Once out of the mold you may want to let it firm up for another day before cutting.  A mitre box can be used to cut straight bars.  It’s important to do this fairly early in the game, because if the soap firms up too much it will cut poorly and flake.
Collect the soap trimmings after cutting soap bars and press them together with your hands to make soap balls.
Set the bars some where dark to cure and harden uncovered for 2-6 weeks.  Like wine, the longer cold pressed soap sits the better it will be.  If you jump the gun and use your soap too soon it may burn you or it may just be too harsh, so its important to let it sit.

IMG_5597
IMG_5599

Long Term Emergency Basic Soap Recipe
(recipe credit – Millersoap.com)
This recipe makes about 9 pounds of pure, hard, smooth no-nonsense soap suitable for hand washing, cleaning, laundry or soap flakes, follow this simple recipe:
  • 13 oz of lye 
  • 5 cups cold water 
  • 6 pounds clean fat (tallow or lard or some combination of both)
Follow the above procedures of making lye water, melting the fats, combining the two, stirring until trace, then adding to a mold.  If you  are in a cool area and it looks like the fat is starting to set up before the lye can convert it to soap (this is known as a false trace), apply some gentle heat to the bottom of the pot.  A false trace may present itself as a really grainy texture.  Stirring continuously and briskly for this recipe is better, when it starts to trace for real it will start to stick to the side of your pot.
There is nothing fancy about this recipe, the soap it produces will not lather real well, and may dry your skin – but it will get things clean.  You may want to give this a try some day, and/or print the recipe out and keep it on hand just in case. 

Wednesday, February 11, 2015

Sunday, February 8, 2015

10. Thin Soloman Bar Paracord Survival Bracelet

This is a great bracelet for those who don’t need a lot of paracord on and and want a thinner bracelet.

Saturday, February 7, 2015

What To Use When There’s No Toothpaste

Dental Hygiene should be a part of our daily lives and even more important in a survival situation for many reasons. Having access to a Dentist may be a serious challenge in a survival or prepper scenario. How will you maintain oral hygiene when your toothpaste has been exhausted? What will be your alternative methods for brushing your teeth? Do you even know that alternative methods exist and has been existing for 1000’s of years? How’s that for a track record?
What if I told you there was a tree that you could use to take care of your dental hygiene, would that not be something you would be interested in?  There is a tree called the Toothbrush tree and people have been using it for 1000’s of years. The scientific name for this tree is “Salvadora Persica, but you can call it the “Toothbrush tree”. The Salvadora Persica is a small, evergreen shrub or tree that grows in hot, dry conditions in parts of Africa, the Middle East and the Arabian Peninsula.

Salvadora Persica Tree
The Toothbrush Tree is valued as a medicinal plant since it contains a number of active compounds that promote good dental hygiene and have been shown to reduce tooth decay, plaque and gum disease.
Here are a few noted benefits of this wonderful natural toothbrush:
Miswak or Siwak natural toothbrush
* Kills bacteria that causes gum disease
* Fights plaque effectively.
* Useful and effectiveness for teeth whitening
* Helps reduce tooth decay
* Removes Bad breath and odor from mouth.
* Creates a fragrance in the mouth.
* Massages the gums for healthier teeth.
* Effectively cleans between teeth due to its parallel bristles.
* Increases salivation and hence inhibits dry mouth (Xerostomia)
How To Use It ?
To use the natural toothbrush: Remove the stick from the package and trim or chew the bark off one end of the stick; about a 1/2 inch. Chew on the exposed end until the twig forms bristles. Brush as usual. No toothpaste required. The natural toothbrush will freshen the mouth. Every few days (when bristles look like an old broom) cut off the exposed bristles, peel bark and start anew. The natural toothbrush should be kept in a clean place.
Enjoy and keep smiling :)
If the tree toothbrush becomes dry, it should be soaked in rose water to soften the end bristles. The end should be cut fresh to ensure hygiene for each usage.
If your looking for a great alternative to fluoride toothpaste, the natural Toothbrush just might be the solution. For the Prepper it is also light and easy to pack in your BOG. You can get these natural Toothbrushes from our website that are vacuumed sealed in order to maintain their freshness i.e. they aren’t dried out branches.

Friday, February 6, 2015

Why We Must Filter Our Water

Botanist John Muir carried no bottled water when he hiked 1,000 miles through the wilderness from Indiana to Florida. Instead, the 29-year-old drank from streams, lakes and an occasional bayou to quench his thirst and lived to write about it.Columbia River in Washington State
Muir knew nothing of filtering chromium, lead, mercury or chlorine from water. In fact, his greatest concern when slurping from a watering hole was whether he dared the snakes or alligators lurking nearby. It was 1867 and our penchant for pouring poisons into the environment hadn’t yet caught up to us.
This month, 146 years after Muir wrote how he “enjoyed to the utmost the blessing of pure cold water” while meandering through the South, West Virginians were warned to not even wash their clothes in Charleston’s poisoned water.
The 7,000-gallon coal-processing chemical spill into the Elk River is merely the latest in a growing number of catastrophes to contaminate vast amounts of our precious, dwindling freshwater supply.
Officials only learned of the spill when residents began calling in complaints about a strong licorice-type smell in the air, according to a recent CBS News report.
So, for those who rely on their public utilities to test their water for contaminants, consider this from the news report:
“West Virginia American Water, which supplies 300,000 people with water in the central part of the state, said it would not have detected the chemical because utilities don’t test for it. Before the spill, no standards existed for measuring the chemical, 4-methylcyclohexane methanol, in water, the utility said.”
When I called Hilary Ohm, owner of Highwater Filters, a Colville, Wash., water-filter supplier, about choosing a water filter, she told me public utilities generally only test for the most common and easiest-to-detect contaminants.
Municipal water reports, by law, must be made available to the public. Sometimes these reports are mailed annually to customers. At a minimum, reports must be publicly posted.
Even though a utility’s water meets government standards, homeowners should still have their water tested for other contaminants and check with their water supplier to learn what chemicals are being added.
Berkefeld water filter“In order to determine the best filtering device, people should get their water tested,” Hilary said. “These reports can be very revealing.”
Besides chlorine and fluoride, a community water system may also add chloramines as disinfectants to the water. In this case, purchase a water filter that is certified to remove chloramines, as well as chlorine and trihalomethanes (a carcinogenic by-product of chlorination).
Even those of us who rely on a deep, drilled well for water should have the water tested for arsenic, metals, methane and other contaminants. The Environmental Protection Agency now recommends testing well water twice a year.
And, while the well water may be clean, it can be contaminated on the way to your faucet. Many homes built before 1998 have lead pipes that can corrode into drinking water, particularly hazardous to pregnant women.
Remember, many contaminants are tasteless, odorless and colorless, such as trihalomethanes or PCB’s, both known as dangerous carcinogens. Taste is not an indicator of purity or safety. The public can check with the EPA to learn about contaminants in a specific area.
Find out about the use of chemicals in your area. Groundwater in agricultural areas, for instance, is subject to contamination from pesticide, herbicide and fertilizer runoff.
Be aware of the industry in your area. During the past decade, for example, hydraulic fracturing (fracking) has come under fire as a possible pollution source as humans try to squeeze every last drop of fuel from the ground.
“Once you know what’s in your water, you can buy the right filter for your needs,” Hilary said.
The most popular home water filters on Highwater Filters’ website – carbon and ion exchange – are reliable and available in many styles to suit individual tastes. Instead of buying many different filters, it is more cost-effective to buy one filter certified to remove the widest range of contaminants.
Of the carbon filters, there are loose granular activated carbon and solid carbon block filters. Distillers are more costly, but do produce clean, purified water from murky sources. Reverse osmosis also is effective, Hilary said, although the system wastes water and is bulky.
Depending on what’s in the water, a shower filter also may be desired. Many contaminants, such as chlorine, are absorbed through the skin or inhaled as in a hot shower.
For a well or a spring-type water system, an inexpensive 10 to 15 micron pre-filter under the kitchen sink, before the line to the filter, will save the drinking water filter cartridge life. This pre-filter will capture the larger sediment particles and prevent premature clogging.
Replace filter cartridges according to the manufacturer’s guidelines, generally every six months to a year with normal use.
Ion exchange water filter
If this sounds like an unnecessary bother, consider that many poisons are cumulative. A lifetime of drinking treated tap water could cause irreparable harm to the heart, bladder, kidneys and reproductive organs.
“It’s unfortunate that we need to worry about contaminants in our water,” Hilary said, “but the reality is that most water in our environment is vulnerable in some way.”
Hilary said it is relatively easy to treat most water to make it fit to drink. It is also a lot cheaper and safer to filter your drinking water than hauling bottled water, which is still unregulated and packaged in potentially harmful plastics, from the store.
“By filtering water with a reliable system, you can provide your family a better sense of security,” Hilary said. “Eliminating the unknown risks is worth every penny you invest to rid your drinking water of unwanted contaminants.”

Thursday, February 5, 2015

Gallup CEO: Number of Full-Time Jobs as Percent of Population Is Lowest It’s Ever Been (Video)

Gallup CEO and Chairman Jim Clifton doubled-down on his comments earlier in the week on the misleading Obama unemployment rate.
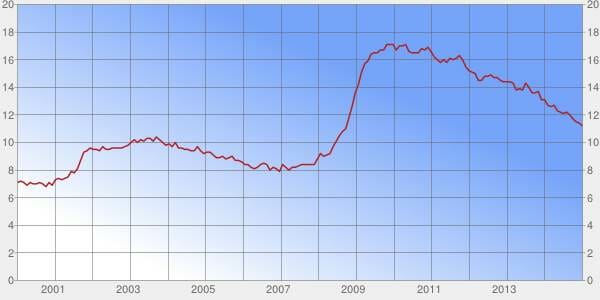
Obama says the unemployment rate is 5.6% which is very misleading.
gallup rate
Clifton went on America’s Newsroom today to explain the misleading government numbers.
The number of full-time jobs, and that’s what everybody wants, as a percent of the total population, is the lowest it’s ever been… The other thing that is very misleading about that number is the more people that drop out, the better the number gets. In the recession we lost 13 million jobs. Only 3 million have come back.You don’t see that in that number. “
The real Obama unemployment rate is above 10%
unemployment obama

Wednesday, February 4, 2015

CEO of Gallup calls jobless rate 'big lie' created by White House, Wall Street, media...

The chairman of the venerable Gallup research and polling firm says the official U.S. unemployment rate is really an underestimation and a “big lie" perpetuated by the White House, Wall Street and the media.
What CEO and Chairman Jim Clifton revealed in his blog Tuesday about how the Labor Department arrives at the monthly unemployment rate is no secret -- including that Americans who have quit looking for work after four weeks are not included in the survey.
The department's current rate of 5.6 percent unemployment is the lowest since June 2008, with President Obama using his State of the Union address and campaign-style stops across the country to tout an economic recovery.
“Our economy is growing and creating jobs at the fastest pace since 1999,” Obama said in the opening lines of his January 20 address before Congress.“Our unemployment rate is now lower than it was before the financial crisis.”
Clifton says the “cheerleading” for the 5.6 number is “deafening.”
“The media loves a comeback story,” he writes. “The White House wants to score political points, and Wall Street would like you to stay in the market.”
Since the start of the Great Recession, which economists largely agree began in late 2007, the unemployment rate peaked at 10 percent in October 2009 and finally got under 6 percent in September 2014.
Clifton says Americans out of work for at least four weeks are “as unemployed as one can possibly be” and argues that as many as 30 million of them are now either out of work or severely underemployed.
He points out that an out-of-work engineer, for example, performing a minimum of one hour of work a week, even mowing a lawn for $20, also is not officially counted as unemployed.
In addition, those working part time but wanting full-time work -- the so-called “severely underemployed” -- also are not counted.
“There's no other way to say this,” Clifton says. “The official unemployment rate … amounts to a big lie.” (Try a real unemployment rate of most likely 10-14%)
His arguments are similar to those made by Washington Republicans after the Bureau of Labor Statistics announced the rate each month during the height of the recession. However, Gallup is an 80-year-old, nonpartisan firm.
The bureau did not return a request for comment.
Clifton suggests the biggest misconception about the official rate is that it doesn’t denote “good” full-time jobs.
“When the media, talking heads, the White House and Wall Street start reporting the truth -- the percent of Americans in good jobs; jobs that are full time and real -- then we will quit wondering why Americans aren't ‘feeling’ something that doesn't remotely reflect the reality in their lives. And we will also quit wondering what hollowed out the middle class,” he said.

Tuesday, February 3, 2015

Choosing a Power Generator

Choosing a power generator is one of the most important decisions a prepper will make. Your generator is one of the first things you will turn to when SHTF.
When choosing a generator, there are a lot of things to consider. Decisions like these can be overwhelming.
Our friends at Survivopedia have put together the ultimate guide to choosing the perfect generator for you. Check out the article below, and read find more information on their site by clicking here.

How to Pick the Perfect Power Generator

Electrical power is a part of our day-to-day lives. While it is possible to live without that electrical power, many things that we use would no longer be available to us. Considering how fragile the electrical grid is and that it only takes a medium-sized storm to start knocking down power lines, it only makes sense to have some sort of power generator for your home.
When most people think of a power generator, they think of a gas operated one. Gas operated generators are relatively inexpensive to buy, but extremely expensive to operate. For any long-term emergency situation, gas operated generators just aren’t practical.
The other problem with gas operated generators is that they are noisy. If you want to maintain OPSEC and not let people know that you are prepared to deal with the emergency, then the last thing you want to be using is a gas operated generator. The noise alone will give you away and attract much unwanted attention.
That’s part of the beauty of solar power. Of all the power options available for use in an emergency, solar power is the best. The one drawback to it is that solar panels are expensive. However, once purchased, there are no operating expenses and solar panels will work for up to 20 years, with minimal power loss. For long-term power generation, solar is the best emergency backup system you can go with.
For solar to become a complete backup solution, you need more than just a solar panel. The solar panel absorbs sunlight and converts it to electricity. Typically, solar panels put out about 18 volts DC, which makes them perfect for charging 12 volt batteries. The slight over voltage of the solar panel means that it will still charge the battery, even if clouds are preventing the solar panel from operating at 100% efficiency.
The 12 volt DC of the battery can either be used as it is, such as for plugging in cell phones and other devices to charge them, or it can be inverted up to 120 volts AC, for use in powering home electronics. Either way, the solar generator is providing necessary electrical power for meeting your needs.
Most solar power generation is done by solar panels that are mounted to a home. However, there are also portable solar generator stations, such as the PowerWhisperer. This is a fully self-contained solar power generation system, with on board battery and voltage inverter. The heavy-duty aluminum case protects the system from EMP and the generator is mounted on a cart, making it portable.
Another thing you might want to consider is having a small, flexible solar panel for your bug out bag. That would allow you to power your electronics while away from home. There are a number of options for those types of solar generators as well. While not big enough to provide electricity for your home electronics, they are big enough for charging cell phones, GPS units, tablets and portable computers that you might take with you on a bug out.

Our Recommendation

The PowerWhisperer is a mobile power system designed with prepping in mind: as a silent system, the PowerWhisperer won’t give you and your family away.
This stealthy power supply provides power for a family when the lights go out; whether due to a storm or an EMP.
Since it isn’t powered by a gasoline engine, there is no noise to alert the neighbors that you have power, while they are sitting in the dark.
The system consists of a high capacity, 100 amp hour, deep cycle lead-acid battery. The battery is charged by two 50 watt, Second generation, flexible solar panels; which are stored in a compartment in the unit. 45 foot leads are provided for the solar panels, allowing you to put them on the roof or some hidden area, without giving away the presence of your PowerWhisperer.
A 2,000 watt voltage inverter provides sufficient power to run any home appliance or power tool. You can also use the 12 volt output for powering devices that are designed for plugging in to a car’s power system, such as for recharging a phone or other portable electronics.
A power station, enclosed inside the unit, provide breakers and connections for drawing power from the unit, as well as a LED readout to tell you the status of the unit and its charge. Connection for the solar panels is provided in the storage compartment. You can also attach additional solar panels for faster regeneration of the system.
The entire unit is housed in a rugged, 1/16 inch thick aluminum case, mounted on two wheels, for movement like a hand truck. Lightweight and compact, the PowerWhisperer can be used for bugging in or if you are bugging out to a prepared bug-out retreat, it can be brought along. The aluminum case is a perfect Faraday cage, protecting the components of the system from EMP. A woodland pattern camouflage net is provided for help in concealing the unit from neighbors while in use.
A compartment for storing the solar panels is also big enough for storage of radios and other small electronic devices, keeping them with the power supply, while protecting them from EMP. Made in the USA, you can be sure about the quality of this unit.

Sunday, February 1, 2015

When Bread Bags Weren't Funny


Last week, in her State of the Union response, Joni Ernst mentioned going to school with bread bags on her feet to protect her shoes. These sorts of remembrances of poor but honest childhoods used to be a staple among politicians -- that's why you've heard so much about Abe Lincoln's beginnings in a log cabin. But the bread bags triggered a lot of hilarity on Twitter, which in turn triggered this powerful meditation from Peggy Noonan on how rich we have become. So rich that we have forgotten things that are well within living memory:
I liked what Ernst said because it was real. And it reminded me of the old days.
There are a lot of Americans, and most of them seem to be on social media, who do not know some essentials about their country, but this is the way it was in America once, only 40 and 50 years ago:
America had less then. Americans had less.
If you were from a family that was barely or not quite getting by, you really had one pair of shoes. If your family was doing OK you had one pair of shoes for school and also a pair of what were called Sunday shoes -- black leather or patent leather shoes. If you were really comfortable you had a pair of shoes for school, Sunday shoes, a pair of play shoes and even boots, which where I spent my childhood (Brooklyn, and Massapequa, Long Island) were called galoshes or rubbers. At a certain point everyone had to have sneakers for gym, but if you didn’t have sneakers you could share a pair with a friend, trading them in the hall before class.
If you had just one pair of shoes, which was the case in my family, you had trouble when it rained or snowed. How to deal with it?
You used the plastic bags that bread came in. Or you used plastic bags that other items came in. Or you used Saran Wrap if you had it, wrapping your shoes and socks in it. Or you let your shoes and socks get all wet, which we also did.
I am a few years younger than Noonan, but I grew up in a very different world -- one where a number of my grammar school classmates were living in public housing or on food stamps, but everyone had more than one pair of shoes. In rural areas, like the one where Joni Ernst grew up, this lingered longer. But all along, Americans got richer and things got cheaper -- especially when global markets opened up. Payless will sell you a pair of child's shoes for $15, which is two hours of work even at minimum wage.
Perhaps that sounds like a lot to you -- two whole hours! But I've been researching historical American living standards for a project I'm working on, and if you're familiar with what Americans used to spend on things, this sounds like a very good deal.
Consider the "Little House on the Prairie" books, which I'd bet almost every woman in my readership, and many of the men, recalls from their childhoods. I loved those books when I was a kid, which seemed to describe an enchanted world -- horses! sleighs! a fire merrily crackling in the fireplace, and children frolicking in the snow all winter, then running barefoot across the prairies! Then I reread them as an adult, as a prelude to my research, and what really strikes you is how incredibly poor these people were. The Ingalls family were in many ways bourgeoisie: educated by the standards of the day, active in community leadership, landowners. And they had nothing.
There's a scene in one of the books where Laura is excited to get her own tin cup for Christmas, because she previously had to share with her sister. Think about that. No, go into your kitchen and look at your dishes. Then imagine if you had three kids, four plates and three cups, because buying another cup was simply beyond your household budget -- because a single cup for your kid to drink out of represented not a few hours of work, but a substantial fraction of your annual earnings, the kind of money you really had to think hard before spending. Then imagine how your five-year-old would feel if they got an orange and a Corelle place setting for Christmas.
There's a reason old-fashioned kitchens didn't have cabinets: They didn't need them. There wasn't anything to put there.
Imagine if your kids had to spend six months out of the year barefoot because you couldn't afford for them to wear their shoes year-round. Now, I love being barefoot, and I longed to spend more time that way as a child. But it's a little different when it's an option. I walked a mile barefoot on a cold fall day -- once. It's fine for the first few minutes, and then it hurts like hell. Sure, your feet toughen up. But when it's cold and wet, your feet crack and bleed. As they do if the icy rain soaks through your shoes, and your feet have to stay that way all day because you don't own anything else to change into. I'm not talking about making sure your kids have a decent pair of shoes to wear to school; I'm talking about not being able to afford to put anything at all on their feet.
Or take the matter of food. There is nothing so romanticized as old-fashioned cookery, lovingly hand-prepared with fresh, 100 percent organic ingredients. If you were a reader of the Little House books, or any number of other series about 19th-century children, then you probably remember the descriptions of luscious meals. When you reread these books, you realize that they were so lovingly described because they were so vanishingly rare. Most of the time, people were eating the same spare food three meals a day: beans, bread or some sort of grain porridge, and a little bit of meat for flavor, heavily preserved in salt. This doesn't sound romantic and old-fashioned; it sounds tedious and unappetizing. But it was all they could afford, and much of the time, there wasn't quite enough of that.
These were not the nation's dispossessed; they were the folks who had capital for seed and farm equipment. There were lots of people in America much poorer than the Ingalls were. Your average middle-class person was, by the standards of today, dead broke and living in abject misery. And don't tell me that things used to be cheaper back then, because I'm not talking about their cash income or how much money they had stuffed under the mattress. I'm talking about how much they could consume. And the answer is "a lot less of everything": food, clothes, entertainment. That's even before we talk about the things that hadn't yet been invented, such as antibiotics and central heating.
In 1901, the average "urban wage earner" spent about 46 percent of their household budget on food and another 15 percent on apparel -- that's 61 percent of their annual income just to feed and clothe the family. That does not include shelter, or fuel to heat your home and cook your food. By 1987, that same household spent less than 20 percent on food and a little over 5 percent of their budget on apparel. Since then, these numbers have fallen even further: Today, families with incomes of less than $5,000 a year still spend only 16 percent of the family budget on food and 3.5 percent on apparel. And that's not because we're eating less and wearing fewer clothes; in fact, it's the reverse.
The average working-class family of 1901 had a few changes of clothes and a diet heavy on beans and grain, light on meat and fresh produce -- which simply wasn't available for much of the year, even if they'd had the money to afford it. Even growing up in the 1950s, in a comfortably middle-class home, my mother's wardrobe consisted of a week's worth of school clothes, a church dress and a couple of play outfits. Her counterparts today can barely fit all their clothes in their closets, even though today's houses are much bigger than they used to be; putting a family of five in a 900-square-foot house with a single bathroom was an aspirational goal for the generation that settled Levittown, but in an era when new homes average more than 2,500 square feet, it sounds like poverty.
At that, even the people living in the last decades of the 19th century were richer than those who had gone before them. I remember coming across a Mauve Decade newspaper clipping that contained a description of my great-grandmother "going visiting" in some nearby town during the 1890s. On the other side of the clipping was a letter to the editor from a woman in her 90s, complaining that these giddy young things didn't know how good they had it compared to the old days -- why, they even bought their  saleratus  from a store instead of making it from corncobs  like they did back when times were simplerand thrifty housewives knew the value of a dollar.
Joni Ernst, who is just a few years older than me, had a much more affluent childhood than the generation that settled the prairies, and more affluent still than the generations before them. But in many ways, she was much poorer than the people making fun of her on Twitter, simply because so many goods have gotten so much more abundant. Not just processed foods and flat-screen televisions -- the favorite target of people who like to pooh-pooh economic progress. But good and necessary things such as shoes for your children and fresh vegetables to feed them, even in winter. 
In every generation, we forget how much poorer we used to be, and then we forget that we have forgotten. We focus on the things that seem funny or monstrous or quaint and darling. Somehow the simplest and most important fact -- the immense differences between their living standards and ours -- slides right past our eye. And when Ernst tried to remind us, people didn't say "Wow, we've really come a long way"; they pointed and laughed.

Friday, January 30, 2015

The Debt Enslavement System That Dominates Our Lives

Forty years ago, the U.S. national debt was less than half a trillion dollars.  Today, it has exploded up to nearly 18 trillion dollars…
National Debt
But the national debt is only part of the story.  The big banks which control the Federal Reserve also seek to individually dominate our lives with debt.  We have become a “buy now, pay later” society and the results have been absolutely catastrophic.  40 years ago, the total amount of debt in our system was just a shade over 2 trillion dollars.  Today it is over 57 trillion dollars
Total Debt

Wednesday, January 28, 2015

WATCH: He Wraps A Matchstick In Foil And Sets It On Fire. What Happens Next...awesome.

9. Tire Tread Paracord Survival Bracelet

This bracelet is woven for easy deployment.
how-to-tie-a-paracord-bracelet-tire-tread-weave.jpg

Supplies you need:

  • Two 9ft pieces of paracord
  • Side release buckle
  • Tape Measure
  • Scissors
  • Lighter
Tire Tread Paracord Survival Bracelet Supplies: scissors, measuring tape, buckle, lighter, 2 9ft paracord strands

Step 1:

For this tutorial, we are going to start with the green paracord. First, fold the green paracord in half to find the center. Take that loop and feed it through the slot on the female side of the buckle.
Pull the ends through and firmly tighten around the buckle.
Fold the green paracord in half and pull the loop through the buckle.
Pull the ends all the way through the loop and tighten.
Pull until the paracord is snug around the buckle.

Step 2:

Let’s go ahead and do the same thing with the black paracord to attach it to the male side of the buckle.
Take the black strand of paracord and attach it the same way to the other end of the buckle.
Pull it snug around the buckle.

Step 3:

Now let’s prep our black paracord to attach it to the green paracord by making some bunny ear loops.
• First, you’ll want to measure the length of your bracelet using your measuring tape. Keep in mind that you want to include half of the buckle in this measurement. For this tutorial we are making a 7 inch bracelet.
• Using your finger to keep the length of the bracelet in tact, fold the two ends down to create two loops.
• Then take the right strand and pull it over the center and under the left strand.
• To finish it off, take the left strand under the center and up through the right loop. (See photos below)
Measure the paracord to the length you want your bracelet.
Take your green paracord and fold the ends down to make two loops at the length you measured for your bracelet.
Take the right strand and pull it over the center pieces and under the left strand.
Take the left strand and pull it under the center pieces and up and over the right loop.
Take the left strand and pull it under the center pieces and up and over the right loop…
 For the rest of the instructions from DIY Ready, click here.