Why?

This blog is to help you in preparing for an emergency. It also contains other information that you might find spiritually up-lifting. This is not an official website of "The Church of Jesus Christ of Latter-day Saints". This site is maintained by Barry McCann (barry@mail.com)

Tuesday, June 19, 2018

How To Test Your Bug Out Bag

Being an avid prepper, it looks so easy to add tons of survival items in your bug out bag! But, have you ever physically practiced bugging out with that much weight? A very important piece of equipment for any survival situation is having your bug out bag with you. Your bug out bag and the survival items in it are the most important part of your evacuation plan. However, your escape plan would not entirely be complete if it is not tested properly. There is a lot of literature, websites and YouTube videos that will guide and get you prepared to your very best, however nothing compares to actually getting out and testing your bug out gear to ensure yours and its’ capabilities can cope with reality.
The fact is there is no substitute for reality! However, you can test your physical endurance and practice bugging out by doing anything. It could be a hiking trail with a 20-30-pound back pack or canoeing into the park river. Through this, you would be able to plan your trip considering any emergency situation and even ready to handle a difficult situation. So, you should first test your bug out bag on your own.
Testing Your Bug Out Bag Plan
Here are our suggestions that would turn your survival experience into a piece of cake.
Weigh Your Bug Out Gear
A heavy bug out bag is a challenge to carry. You cannot blindly put plenty of survival items in your survival pack, without knowing that is it possible to even carry it for few blocks or few miles.  And, it’s quite possible that you’ll end up discarding some of the stuff or even the whole pack in a survival situation.
So, you need to plan things. It’ll make any difficult or easy situation that much simpler if you are familiar with using your bug out gear and moving around with it. List down necessary essentials and arrange a bug out bag list for your trip. Ensure whether the suitability and reliability of your equipment is appropriate for the wilderness or not. Also, share your trip plans with your team mates and family in order to avoid any mishap and any situation in which they need to find you. Here’s a great Urban Survival Bag For 2 to get you started. 
Check the weight of your bug out bag as to whether it will be too heavy or bulky in weight to carry on your back. Avoid duplicating things in your backpack. You can alter the items according to your needs. You can replace the non-essentials with essentials such as if it is summer then you need to add more bottles of water or ways to purify water on the go.
Method Of Navigation
Being prepared for a disaster is a necessity. Every phone has GPS and some kind of built in map tool. Being a prepper, you have to be ready for a worst-case scenario, where your phone might run out of battery and your cell service will no longer be available. Or, in case the weather turns bad and your GPS goes on the fritz. Thus, you should consider making a back-up plan for this purpose.
There are some basic navigation tools, which you can put together to help you to find your way in the wilderness. So, apart from GPS, you need to have a portable navigation kit to find your way in the woods. This includes an accurate and durable baseplate compass, topographical map for the area you are traversing, SE navigation cards, and a fine point pen (to make notes). You should use a lanyard to keep your kit around your neck for quick access. You also need to store and protect your map by placing it in a zip-lock bag until you need it. For better protection, use a water-proof document holder.
Escape And Evasion Routes
Next thing that comes after navigation is to plan your escape and evasion routes. Have your routes down and plan your way out already. You should know the alternative bug out routes. If you are in city, and highways are clogged due to some nuclear strike or snowstorm, then you’ll have to walk out of the urban areas.  You need to know the alternative routes if you want to stay off the highways. So, avoid the refugee routes as these are the main highways. Take your route to smaller roads as these will more than likely provide more options. Since people are creatures of habit, they are going to use these main roads that they are used to travelling on a daily basis. Therefore, you must know some of the different roads and routes that you can take and practice them.
Weather
Plan your trip to test your endurance and your bug out bag by increasing the difficulty level. It is better to be prepared for the worst weather condition. A sensible prepper will know what items to pack according to the weather of that particular bug out location. They say that there is no such thing as bad weather, just inappropriate clothing. In winter, the main goal is to stay warm, so locate an area where you’re surrounded by dry, seasoned wood or a natural outcropping of coal.
In case of rain, you still need your bug out bag gear dry. For this purpose, you should have appropriate water-repellent clothing and durable raingear to go in your pack that will keep you warm and dry. Wool is one of the natural materials you’ll want to have for this occasion and definitely on your bug out bag list. You can expect to remain warm even if you get wet due to its insulation property. More so, there are many waterproof technologies that not only keep the water away, but also allow your body to breathe and avoid the water buildup. These Special Ops Soft Shell Jackets from Rothco are perfect and come in a range of styles to suite, so be sure to have a look. 
Survival Camp Security
Make sure that your location is well-hidden and off any of the main paths. You should hike into the woods a descent distance to somewhere that is secure and secluded. You should also make sure to limit the number of infiltration points into your camp. You can also try to create a natural security barrier around your survival camp, such as rock facing to the north and using some densely vegetative areas to remain invisible. Therefore, you want to try to create that natural barrier to reduce the likeliness to be easily approached upon.
You should have a clear exfil plan. Let’s say, if you are compromised by somebody with a weapon. You need to get your loved ones out of that area quickly and safely. Make sure that you have a well-defined and practiced plan to handle such panic situation.
Discipline
If you are relatively close to populated areas, then you need to be mindful of how much noise you are making. Especially, if you plan on building a fireregularly, its smoke is going to be seen at some point by people. You need to learn which types of trees in your bug out location that don’t produce a lot of thick, heavy and black smoke. The lighter ones are going to help you with that whole discipline.
Resources
Water is one of your primary resources for obvious reasons. While bugging out, make sure that your camp is going to be near water but not too close to it. You want to be at reasonable distance because of having to transport that water back to your survival camp. So, don’t make it too far, otherwise it will become a pain for you, since it’s something that you are probably going to do everyday. For every ten miles of walking, you should have at least two quarts of water to keep yourself going. Keep yourself hydrated regardless of which season you are bugging out in. Alternatively for on the go hydration, you can’t go wrong with the Lifestraw. Small, compact, cheap and super easy to use. Just add water. 
Bodily Effects
One of the important factors to sustain in a crisis is your physical fitness. You’ll more than likely be carrying your bug out bag every day and will therefore need the stamina to do so. The stamina to sustain the bug out bag and walking the long miles will vary from person to person. If your destination takes more than few miles with a heavy bug out bag, people with less stamina are probably going to get fatigued really quick. Therefore, ask yourself a few questions about your personal decisions before such a disruptive event occurs, such as how far do you reckon you would be able to travel and then how far do I need to travel to get to my secure place.
Don’t risk your life though over testing your bug out bag. Start with a low pace and short miles and then follow an average stride. Pre-decide your mile coverage and never assess distance by the time you took for a walk. By doing this, your legs will not feel much pain. And, you would be able to cover your distance without getting fatigued.
Testing Your Bug Out Bag Conclusion
It is thoroughly recommended to test your bug out bag in the wilderness for at least three days. This way, you would be able to determine which supplies you might need. You’ll also get a chance to upgrade and further build up your endurance ability, so you can go miles ahead in the future. You’ll get to know which items you need to ditch from your bug out bag list and which ones you need to have more of. In any case it will surely be great workout and spiritually rejuvenating experience for you. You should try it at least once in a year.

Thursday, June 14, 2018

Non-electric, fuel based lamps

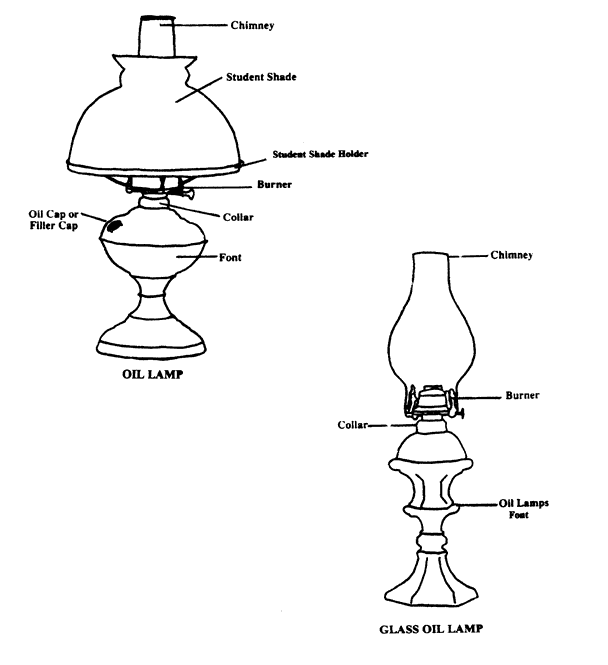
There are a variety of different styles of lamps and lanterns that allow one to not use electricity.  This post will be concentrating on those that require some sort of fuel, oil lamps and lanterns.   It will also diagram the basic pieces of a lamp for clarity.

Lamps evolved from a very basic concept.  Get a pot of grease or oil and stick some sort of wick in it. Like this one: 
It’ll burn and provide light.  More modern lamps have some pieces in common that are a little more specific.
They are:
  • The font:  The part of the lamp in which fuel is stored.
  • The collar or filling cap:  This is where fuel is added.
  • The burner:  The metal piece which holds the wick and is able to pull it up as it burns.  The burner adjusts the wick.
  • The wick: A piece of cloth which draws up fuel from the font.
  • The mantle:  A slightly radioactive shell which incandesces when lit.
  • The chimney:  A glass pipe which allows for better draw on the wick, allowing it to incandesce at it’s optimal height and brightness.
In modern terms, however, the idea evolved into some fairly distinct lamp types.  This post will detail the differences in each.
Lanterns were designed for outdoor use.  They have a more rugged casing than their indoor counterpart and usually, a swinging handle on the top.  They are better protected against wind and gusts.  Lamps, however, have none of these things.  They tend to be meant to sit on a surface, either a table top or in a bracket which is attached to the wall.  Just remember, when folks are talking about this, lanterns can be lamps, but lamps cannot be lanterns.   (Confusing enough?  ðŸ˜‰ )
Lamps come in a variety of shapes and sizes.  Most commonly, they come in a few basic variations.
  • The hall or bedroom lamp, with an pixie burner, which gives off a single candle’s worth of light. Other small burners are called acorn or nutmeg.
The lamp on the left is a hall or bedroom lamp.  The one on the right, a banquet or pedestal lamp. 
  • The table lamp, with a number 2 burner, which gives off approximately 3-5 candle’s worth of light.
  • The banquet, pedestal lamp, or student lamp typically with a number 3 burner, which gives off approximately 5-7 candles worth of light.  These lamps come in a variety of styles.
  White and Blue Glass Pedestal Oil LampLate Victorian brass table oil lamp of baluster form flanked by twin handles and raised on a black circular plinth with white glass shade
Aladdin Vaseline Short Lincoln Drape Incandescent Oil Lamp 
  • A mantle lantern, which gives off several light bulb’s worth of light.
Now, besides the amount of light each gives off, what are the differences?
  • The hallway lamp is itty.  It’s meant to be a “don’t stumble as you make your way down the hall” lamp.  It is the smallest of any of this type of lamp, both in size and the amount of illumination it provides.   It typically has a round wick that is about ¼ of an inch in diameter.
  • The table lamp is the most common lamp that is found.  It’s the one that you can go to the hardware store or Walmart and still purchase for around $10.00. It provides decent lighting, if you don’t need to see a lot.  For better vision, you’d need several of these.  This type of lamp has a flat wick that is about ½ inch in width.  Typically, this type of set up is also that found in most outdoor oil lanterns.
  • A banquet lamp is a pedestal lamp, and provides the most light of the simple burner type.  (flat or round wick)  This type of lamp is findable at garage & estate sales and is made new, but more difficult to find.  It has a flat wick that is about ¾ of an inch in width.
    • There is some crossover between the preceding lamp and the next lamp.  You may find a pedestal lamp with a large draft – this is a crossover between clear lamp types.  Manufacturers experimented with styles until they found those that were the most stable and provided the most light.  They also tended to use the next burner as it came off the production line, before the designed font for the lamp may have been ready in its production run.
  • A center draft lamp is where we get off the beaten path.  This type of lamp was the height of burner only technology.  These lamps most commonly went under the names Rayo and B&H (Bradley and Hubbard).  They have vents around the base of the font, a large burner with vents on the bottom, a flame spreader and a round wick.  They are a little more mechanical than the other oil lamps.  They’re also reminiscent of a donut.  They have a hole for the draft directly thru the font, but it’s engineered into the design.   They also provide the most light.  These frequently came with a glass shade over the chimney to provide some glare protection and diffusion.
  • A hybrid lamp.  Hybrid lamps get the best of both worlds.  The burner, which wicks up oil to burn efficiently, and a mantle, which provides a LOT of light.  These lamps are the top of the line oil lamps, both in the past and now.  The bottom of the line hybrid currently runs for around $130.
  • A propane camping lantern.  This lantern changes both fuel and how it burns.  In all previous lamps and lanterns, there was a burner.  This brought the fuel up from the font and allowed the lamp to burn it.  With a propane lantern, the fuel is pressurized so that it feeds thru the piping under its own power.  This type of lantern is the brightest of any of the different types.
A word of warning:
Mantles allow for fewer moving parts, but also have their own problems.  They are a small silk and ceramic bag impregnated with metal salts.  This bag may well have radioactive isotopes.  The standard impregnation technique involves thorium oxide. It is what allows the light to be very bright.  Standard use poses no problems to health. The mantle is attached with a string to the fuel source and lit.  The silk then burns off, leaving behind a ceramic mesh.  Mantles can be very delicate and fussy to use.  If you have not previously used one, you may wish to do so with a ready supply of new mantles on hand, as they tend to break easily.

Tuesday, June 12, 2018

Preparing for an Emergency When You Have a Chronic Illness


Credit:Adobe Stock
Even those with a disability or chronic illness should be prepared for an emergency situation should one arise. Prepping isn’t just for the able-bodied.  The task may just be a bit trickier, as there would be more equipment and necessities to have on standby than usual. A different exit strategy could also be required, depending on the severity of the disease.

Prepping When You Have Lupus


Credit: GETTY IMAGES
Those who have received positive lupus test results need to be careful when prepping. Certain foods can cause flare-ups, so there are some things that need to be avoided while packing. Processed meat products are one issue, meaning no Spam or store-bought beef jerky should be included.  It is also best to fill the diet with dairy as much as possible since certain medications can cause damage to the bones. This may mean having cows to get milk from and planting leafy green vegetables to eat should the situation become dire. If a person has lupus, it is also imperative that they keep their medication supply stocked and take it along with them when they need to leave in an emergency.

Prepping When You Can’t Walk

It’s easy for most people to get up and run when a terrible situation arises that they need to get away from quickly. Those who have a disability or illness causing problems with mobility may have a more difficult time. Keeping extra crutches or a walker in a vehicle may help.  They’ll have the needed mobility if they can’t take a battery-operated device. If people can’t walk entirely and need to get away fast, they should be certain they have a manual wheelchair handy since power wheelchairs won’t last long when the world is ending. Anything that works by hand is the best to have in a dire situation. A person always knows they can get away when needed, and not stuck without a charge.

Prepping When You Have Diabetes

Watching the sugar content of foods being packed is important when you have diabetes.

Credit: ISTOCK
The proper medication needs to be taken along if people leave in an emergency. It is imperative to have insulin pumps and other required supplies to manage the disease. Having extras packed and ready to go, so getting away fast without need to stop to think and grab supplies in the heat of the moment is best.

Prepping When You Have a Seizure Disorder

Stress can trigger seizures. So anyone with a seizure disorder needs to learn some proper stress management techniques to utilize while on the road. An unexpected emergency situation is one of the most stressful things to go through. Knowing how to cope while going through it is highly important. Those who regularly have seizures should also make a prep plan with someone they know who lives nearby. That person may need to know the right way to handle a seizure if one occurs, such as placing something soft underneath the head.
The survival guide for handling a pandemic stresses the importance of being prepared. Food, water, and a first aid kit should be the starting point for everyone, regardless if they live with a chronic illness or are perfectly healthy. After this basic list of supplies is compiled, it is then necessary to think about and pack any additional necessities needed depending on the situation. Anyone can be a prepper, it just takes some careful thought and planning to make sure you’ll survive.

Saturday, June 9, 2018

Inspire Those Around you to Start Prepping

Do you know the one question that always comes up? Do you know the biggest struggle that preppers face outside of money in our little niche? 

It’s the struggle of getting those around us to take preparedness and survival as passionately as we do! 
Getting Family Inspired
We are inspired people and our passion manifests itself in some weird ways. Unfortunately, that passion doesn’t always translate to those we are closest to. I will come right out and say it, that’s a big problem. Emergency preparedness is a serious part of any American’s life. What’s most terrifying is how easily we ignore the signs. 
  • ·         Civil Unrest
  • ·         War 
  • ·         School Shootings
  • ·         Financial Disasters 
  • ·         Backwoods Emergencies
  • ·         Natural Disasters
These are all things that make headlines. I know we like to bash the mainstream media, but these are all stories that are likely being reported on right now. We get plenty of warning about the potential of these situations and yet many Americans take no action. 
So, the question that comes up, invariably, is something along these lines, “How do I get my (wife, kids, husband, Mom, Sister) to start paying attention and taking action?”
Over the last several years we have generated a number of responses to this question. You know, the answer is always going to be unique to the situation but one of these 4 answers almost always helps the situation. 
Get Outside 

A quarter of Americans spend almost an entire 24 hours without going outside and downplay the negative health effects of only breathing indoor air, according to a new surveyclaiming a new “indoor generation.”

https://www.washingtontimes.com/news/2018/may/15/quarter-americans-spend-all-day-inside/
It is a sad but very true realization that we all must face. As a whole America is getting fatter, slower and less active. Its gotten so bad that I just heard Tim Kennedy, Army Special Forces Green Beret, talking about how the army special forces are struggling to find recruits. 
The people aren’t smart enough, they are on drugs and they are obese. Those were the basics of his message. 
While you do not need to push people into the adventure class where they are hiking the Rockies, just getting away from technology and getting outside more often is a great way to start. Outside you can learn about the natural world. The power of trees as a four-season resource, how the wildlife can feed you and what you can create from the natural world around you. 
Take a Class
The issue with just getting outside and hoping for the best is that it takes time. If you have time, then take it. There is no better way to spend a life than walking alongside the people you love. 
That said, if you are looking for a fast track to inspiring those around you, you need to sign them up for a class. All over this nation there are survival schools and wilderness schools that are teaching people all sorts skills. Imagine bringing the family, or that person you are looking to inspire to prepare, to any number of classes like these:
  • Urban Escape and Evasion
  • Bushcraft 101
  • Land Navigation
  • Foraging Wild Foods
  • Medicinal Herbs in the Wild
  • Primitive Blacksmithing
  • Wilderness Shelter Building
  • Wilderness Tool Making
  • Urban Survival Skills
These are just examples of courses that are laid out all over the nation. While I have been writing and studying preparedness for nearly a decade I am never more inspired than after taking one of these classes. It’s a serious departure from the monotony of life and the hands-on opportunity can really get people into what they are doing. 
Buy Them a Kit 
Sometimes the right purchase can change everything. You have to be very careful about buying preps for the people you love. You have to be thoughtful. If you offer them something too terrifying and garish, like a gas mask or an urban tactical survival kit, they are going to be put off immediately. That’s just the reality. 
I have spent a long time looking over survival kits and I have found the perfect gift that is just the right amount of survival and the right amount of practicality. Its called the MHA Bushkrafter by WB BushKraft. The kit contains over 15 essential survival items and has you covered 
• First Aid
• Shelter
• Fire
• Water
• Foraging
It comes with a great custom 1000D nylon cordura carrier that can be worn around your waist. This kit wasn’t built for the apocalypse, though it would be a great kit to address the issues therein. The MHA Bushkrafter was designed with inspiration from a man who actually blazed the Appalachian Trail. Myron H. Avery was an Appalachian Trail pioneer and from his journal the MHA Buskrafter was born. 
Find a New Hobby
• GeoCaching
• Drone Flight
• Rock Climbing
• Kayaking
If the people around you are terrified of traditional outdoors i.e. hunting, fishing, camping than you can look for a hobby that is outside the realm of that tradition. Today, we have so many options, but we are always looking for the quick and easy fix. 
While the activities above may even be foreign to you, that could be a good thing! Maybe you’re a bit of a know-it-all and the family doesn’t want to hear your preparedness talk for that reason. 
What if you started a new hobby together. What if it was something that you and your loved ones could learn about? Flying drones and searching for geocaches has a direct links to things like urban survival intelligence and burying emergency caches. If you start rock climbing or kayaking, you are merely adding a new skill to your list while drilling in the importance of dominating and appreciating the natural world.
Prepping is a Journey
Prepping has nothing to do with a tv show or a lofty assumption. Prepping is a journey. It’s a river and it has many tributaries. If you enjoy the journey of preparedness you will likely find yourself in a situation where you have a tremendous amount of opportunity. Just from the springboard of prepping you could find yourself 
  • And many, many more things
  • Using Essential Oils
  • Training
  • Homesteading
  • Relocating
  • Planning Permaculture
  • Gardening
  • Training in Firearms
  • Using Herbal Medicines
  • Preserving
  • Fishing
  • Trapping
  • Hunting

Monday, June 4, 2018

How to Escape From Dangerous Forest Animals

No doubt, everyone loves to have fun. No matter how busy or tight our schedule is, we will always find a time to hang out with family and friends or go on a vacation. Nowadays, people like to go to the forest. They believe there lies almost all the beauty of nature. You get to see different species of animal and plant. You can also, get to see amazing waterfalls and flowing river. To some people, they like the forest because of the calmness- no noise except the pleasing sounds of birds and some other creatures.

But do you know the forest can be dangerous? Don’t forget, all that glitters are not gold. Even though, being in the forest can be fun you still need to put the fact that you can encounter wild animals into consideration.
Of course, animals are literally quiet and interesting. The other side of the coin can tell a different story. When the other side comes up, and you are all alone in the forest, you would be left with your inferior instinct to protect you.
You need to understand that the dangerous animals that are found in the forest have different ways they react to you when they encounter you. Some of them might run away, some might stand and scream, while some might be ready to attack you. Either way, have you ever thought of what you would do if you find yourself in this scenario?
Read on as we will show you how to escape from dangerous forest animals. Some other important information will be discussed for you to have a full knowledge of the subject matter.
WHAT IS A FOREST AND WILD ANIMAL?
Yes, let’s start from here. This will give you a basic knowledge of what a forest really is. A forest is a large area of land covered primarily with trees. Its area can be thousands of kilometers. It is obviously different from a bush.
Wild animals could be found in all ecosystems. They are animals that are not domesticated or tamed. They learn to survive on their own, in all weather and climatic conditions. Some of the wild animals you can come in across while adventuring in the forest are Bears, Wolf, Cougar, killer bees and much more.
WHAT WEAPON CAN YOU TAKE ALONG?
There are lots of weapons you can take along with you, but you have to make sure they are legal. You can take along firearms if allowed. You can also take a deterrent (like boar or pepper spray) along; it is safer. Do you know your greatest weapon while in the forest? It is definitely your brain. You need to be mentally active and ready. Trust the instincts of your gut; it might be the best thing you can do to keep yourself active, sensitive, and safe.
HOW CAN YOU ESCAPE DANGEROUS FOREST ANIMALS?
We are going to answer this question by showing you how to escape from the common dangerous forest animals.
  1. Bears
Image3: Credit: bear.org
Generally, all bears are dangerous. If you come in contact with them, you have to be very careful, especially if their cubs are around the area. The first thing you should do is move away from the cubs if there are any. If you know, you are not alone in the forest and noticed the bear does not pose a threat, try and shout to alert people.
In case, the bear, approach you, raise up your hands. It will make you stand tall. If you are with friends or family, you can all come together. You can also put someone on your shoulder to make you look tall. It would intimidate the bear and make him/her move away. Always remember, do not look at the bear eye to eye. This applies to some other wild animals too.
  1. Snakes
Image 1  source: Here
Having the snake boots for hunting is the most important thing you want there to be with you.If you encounter a snake, you should not try and capture or kill it. You can just change your direction of movement. If you see that the snake is not ready to back off, bang your leg on the ground. This should be okay to get it off your way.
But if you are bitten, you can:
  • Pull the snake away instantly
  • Call the emergency service with no delay
  • Tie the bitten area to slow down the venom from reaching your heart
  • Do not suck the venom, drink alcohol, and use ice
  • Increase your water intake and go to a nearby hospital
  1. Cougars
It is also known as a mountain lion. If this animal sees you as a treat, it will follow you up looking for a perfect time to attack you. If you have the prior knowledge of the forest having Cougar, it is advisable you wear a big cloth or walk in groups. Wearing a big or large cloth could make if work away. Also, they hardly attack people moving in groups.
However, if it attacks you, fight back by hitting the mouth and eye hard while
  1. Wolves
Image2: Credit here
You need to watch out for this cunning animal too. They are always after ripping off the muscles of the legs. When you see a wolf, do not make any attempt to run. It can result in an immediate attack. Try yelling at the wolf; it should back off. However, if you are surrounded by a few numbers of them, it might be time to show your attacking skill. Take out your weapon. A firearm will work better this time. Fight them off and get to safety.
  1. Bees
In case you mistakenly disturb a bee hive, it is time to make a run for your life. Do not just run in a random direction. Run against the wind; it will help you knock off the bees. Look for a shelter to hide and stay there till you are very sure that they have left. Do not enter the water; it might be a costly mistake.
We know there are a lot of wide animals you can possibly encounter in the forest. The ones discussed above are the common ones we believe you should know. If you  are  going to hunt, create a must-bring bag  so you’re never without that one thing you forgot to bring: hunting boot, hunting light, weapon.. Always, remember, in any situation you find yourself in the forest, your brain is your greatest weapon. With this, you can survive any dangerous forest animal attack.

Friday, June 1, 2018

Which Foods Have the Longest Shelf Life? Pantry Stockpiling Tips You Need

One of the basic prepping tenants is stockpiling easy-to-store foods that are readily accessible in case of an emergency or crisis. Yet, it goes without saying that while a fresh deli sandwich might sound great, some foods store easier and for longer than others. Today, let’s take a look at some foods that make excellent hoarding basics and can fill you up in a hurry.

1. Honey
There have been accounts of archeologists discovering pots of honey in ancient tombs while excavating the pyramids of Egypt. The oldest sample they found was reported to be around 3,000 years old! The best part? It was still totally edible. Not only is honey excellent to have on hand as a meal supplement, it also acts as a great natural sweetener for oatmeal, teas, and other semi-bland foods in your prepping pantry. Moreover, honey is also touted for its medicinal properties and makes an ideal throat soother or even a topical antibiotic in a pinch.

2. Dehydrated Milk, Whey and Eggs
Acting as a basis for other dairy products such as yogurt, sour cream, cream cheese and more, dehydrated milk can be reconstituted quickly to serve as an excellent source of protein, potassium, vitamin D and calcium – all critical elements your body needs. The same goes for eggs, which can be purchased in powdered form and stored without harmful additives or preservatives. It’s helpful to store dried milk and eggs alongside moisture absorber packets to ensure they stay dry. If your milk is packaged in #10 cans, this may be unnecessary.
In addition, it’s also helpful to stockpile another nutrient-rich ingredient: whey. One of the most complete proteins available, whey is chocked full of essential, branched-chain amino acids. Unlike casein, which constitutes the thick part of milk after it sours and separates, whey is the yellowy, liquid portion. In powdered form, both casein and whey offer a protein power boost, but a scoop or two of whey powder added to a quick smoothie catalyzes protein synthesis quickest.

3. Dried Beans
Some studies have shown that dried beans can last up to 30 years and still retain their taste and health properties. Packing around 1,250 calories per pound, beans make an excellent, fiber-rich and carbohydrate-heavy meal. Store your beans in a dry, enclosed container, inside of mylar bags if possible. While they can last decades, it’s best to consume dried beans within 7 to 10 years if possible. To increase softness when you cook them, add ¼ of a teaspoon of baking soda for every pound of beans into the pot while cooking.

4. Salt
This one won’t act as a meal replacement, but it’s an essential part of any stockpiled pantry. Stored in the absence of any moisture, salt can last indefinitely. It’s a critical part of many other food preservation methods such as canning or picking. In addition to those salts, also stock up on simple iodized salt. In addition to flavoring food and restoring electrolyte balance, it can also help kill bacteria from wounds. Like honey, it can also be mixed with water for a quick sore throat remedy. Iodized salt is also used to cure meat.

5. Rolled Oats
If you’re used to starting each morning with a bowl of oatmeal, you’re in luck. Rolled oats have a shelf life of around 30 years and are great sources of fiber, while also being low in saturated fat. If you plan to cook the oats, be sure to have plenty of distilled water on hand to do so. To cut down on cooking time the next morning, you can soak the oats overnight. One cup of oats to about four cups of water is a good ratio to use. Then, the cooking time should only be around 10 minutes instead of the standard 30.

6. Pasta and Rice
There’s a reason marathon runners “carb up” on a big bowl of pasta the night before the big event. Arguably no other food packs as powerful of punch when it comes to carb-fueled energy. Dried pasta can last up to 30 years, while white rice can last around 20 years. The best part about stockpiling pasta is that it’s typically found already dried, with little to no moisture content or fat. Feel free to get creative with this one and mix it up a little, as eating bowl after bowl of spaghetti can bore even the most ambitious prepper. Stockpile a few boxes of rotini, macaroni, penne, or linguini. You can even add gnocchi pasta (made with potatoes), couscous, or even Asian-inspired pastas such as ramen, soba, rice noodles, or chow mein.

7. Potato Flakes
Nothing says comfort food like a warm bowl of mashed potatoes, and with dehydrated potato flakes on hand, you can have just that in a matter of minutes. Lasting around 30 years if stored properly in a #10 can, these handy flakes have an incredible shelf life. In mylar bags, they can last around 15 years. In addition to simply mixing them with hot water for a quick side, you can add potato flakes to other recipes, such as onion rings or even breads, for a satisfying crunch.

8. Dehydrated and Freeze-Dried Fruits
Dehydrated and dried fruits make great snacks for a quick jolt of energy. In particular, raisins are jam-packed with fiber, iron, protein, and vitamin C. Keep in mind that dehydrated and freeze-dried are two different terms, and depending on the preparation method of your fruit, you’ll need to store them differently. Dehydration removes around 80% of the moisture from the fruit, while freeze drying removes up to 99%. In general, dehydrated fruits will last around 15 to 20 years. On the other hand, freeze-dried fruits can last a little longer, around 25 to 30 years.

9. Dehydrated Carrots
One of nature’s most delicious and nutritious vegetables, carrots are loaded with vitamins and minerals and are rich in beta-carotene. When dehydrated, they can last up to 20 years! Excellent as a meal or snack on their own, they can also be powdered and added to other vegetable powders such as onion, beans, and potatoes for a great seasoning.

10. Canned Meat
Lasting only around three years, canned meat doesn’t have quite as long of a shelf life as other items on this list, yet it’s an essential in any prepper’s stockpile. One surprisingly nutritious and convenient option? Spam. Reasonably priced and high-quality, the meat consists of pork shoulder and ham, unlike other processed meats that are otherwise mechanically recovered remnants. While it might not win you any health awards, it does provide a quick dose of protein, sodium and fat – all items that your body craves when it’s working hard. It’s also versatile, and works just as well straight from the can as it does fried on a sandwich or chopped and added to a stew. Also look for canned, chunk chicken breasts, canned beef stew, chili, and canned tuna. When it comes to the latter, look for options canned in oil, as they’ll last longer than water-canned alternatives.

Stockpiling Your Prepper’s Pantry
While the above list isn’t exhaustive, it serves as a basis for your stockpiled pantry. The key to achieving the maximum shelf life for all of these items is to store them in an area that has very little to no moisture present. If kept cool and dry, these will last you for years to come, ensuring that no matter what happens, you and your family won’t go hungry.