Why?

This blog is to help you in preparing for an emergency. It also contains other information that you might find spiritually up-lifting. This is not an official website of "The Church of Jesus Christ of Latter-day Saints". This site is maintained by Barry McCann (barry@mail.com)

Wednesday, May 31, 2017

Propane or gas: How to choose a lantern and/or stove fuel

Check out this Altoid tin survival kit kit with knife!

Let’s assume an emergency scenario where wood heat/light are not an option.  You can’t use a campfire and a biomass stove is out of the picture.  Maybe there is extreme fire danger, open fires are prohibited, or there isn’t a ready supply of fuel.
Should you have a propane or gas lantern or stove?  Tank or canister?  What are the advantages, disadvantages and what considerations should you be aware of?
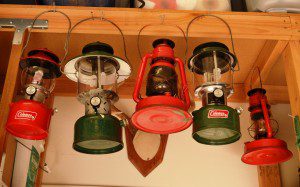
My collection includes kerosene, gasoline and propane lanterns. The best  choice will depend on the situation, weight, safety and availability of fuel. (Pantenburg photo)

I can’t make up my mind which fuel is best.  I currently have one propane and four Coleman gas lanterns.  I own a dual-fuel campstove, gas backpacking stove, and one small stove that screws on top of a propane cylinder.  My go-to stove for all off grid cooking is a double burner Camp Chef propane cooker that uses bulk propane.  I have a propane space heater for emergency warmth.
Your emergency preparations should include some thoughts about lighting, heating and cooking implements over the long term.  Basically, your choices will boil down to two main categories: propane or liquid fuel (gasoline).
Before you buy anything though, consider where the appliance will be used.  Are you car camping, where weight is not an issue, or backpacking above the tree line, where weight will be a major consideration?  What temperatures will the item most likely be used in?  How important is long term use and the ability to replenish the fuel?
Here are some shopping considerations:
  • Convenience and ease of use:  Does the fuel source affect how easily the implement can be used?  There is no pouring, priming or pumping with propane.  With gas, the implement must be filled, and sometimes primed and pumped.  While the gas implement is operating, it will occasionally need to be pumped.
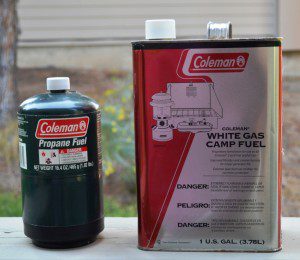
    Propane or gasoline? Where the appliance will be used, and the operating conditions will determine the best choice for you. (Pantenburg photos)

  • Fuel availability:  The dual-fuel gas implements can use unleaded gasoline, at a fraction of the cost of Coleman fuel or white gas.  I’ve bought Coleman gas at tiny little stores in out-of-the-way areas of northern Minnesota, where the store inventory was sketchy at best.  Conversely, I’ve also seen standard 16.4 oz disposable propane gas cylinders at many of these same stores.  I’m guessing gas is still easier to find, but bulk propane is also very common and cheap.
  • Cost:  Last week at the local WalMart, the disposable propane cylinders were on sale for about $6 for two cylinders, versus almost $10 per gallon for Coleman fuel.  The dual-fuel gas stoves and lanterns are the clear winners in the cost-effectiveness category, with unleaded gasoline from the pump costing about $4 per gallon.  Not to mention, a dual-fuel implement can be re-fueled with a siphon hose from a vehicle gas tank.
  • Safety:  As a Boy scout volunteer, I see safety around fire as paramount.  I’ve noticed that the propane lanterns and stoves are easier, and hence safer, for the boys to light and use.  There is no priming, pouring or fuel to spill.  The idea of a container of gasoline anywhere near an open fire, with kids around, makes my blood run cold.
  • Implement design:  My Coleman model 442 backpacking gas stove has a listed weigh of 24 ounces.  That, in part, is due to the pump and generator required for a gas stove.  My single burner propane stove that screws on top of a propane cylinder weighs less than half that.
  • “Green” design:  I don’t like the disposable propane cylinders – they work great, but it seems to be a terrible waste to throw away the empties.  For a long-term situation, such as a lengthy campout, though, a bulk propane tank can be filled for about $2-something a gallon, making that option an economic favorite.
  • Temperature:  Cold affects propane’s effectiveness.  In extreme cold, a propane cylinder may not work at all.  Gasoline is not affected.  That’s one reason why I have so many gas-powered implements.

Monday, May 29, 2017

10 Rookie Food Storage Mistakes

food storageAre you new to food storage?  Each experienced prepper began just as you.  Take advantage of their mistakes by learning the 10 Rookie Food Storage Mistakes that should be avoided:
  1. Having buckets full of grains, beans or wheat, but have never cooked them before.  Make sure to practice cooking with your food storage.  Also note that if storing wheat berries you will need to have a wheat grinder to make flour.
  2. Storing food that your family does not eat.  In a stressful emergency time, it will be such a comfort to serve familiar foods. Make a list of favorite foods then begin storing them.
  3. Not rotating food storage.  Even though some foods can go past their expiration dates, you should try to use your oldest food storage first.  A system of putting newer food toward the back of the shelf and rotating the oldest to the front of the shelf will help prevent food waste.
  4. Minimal variety of food for a balanced diet.  To prevent food burnout it is best to store a wide variety.  Try storing many varieties of fruits, vegetables, grains, beans, meats, seasonings and staples.  Also keep on hand foods that are freeze dried, canned, dehydrated, MRE’s, and prepared as instant packaged meals. 
  5. Poor choice of storage containers.  Prevention of pests and rodents invading your food storage is key.  Using the right food storage containers also prolongs shelf life, nutritional value and taste. Food grade plastic containers, Mylar bags, glass canning jars, #10 cans and even buckets all help to maintain a longer shelf life.  
  6. Never put all your eggs in one basket. Store dehydrated and/or freeze dried foods as well as home canned and “store bought” canned goods.  These varieties will help to balance out your cooking options and even add a variety of textures and flavors.  Another take on this point, is to not store all of your food storage in one location.  Instead of having all of your food storage in one location, it may be wise to have other hiding locations.  False walls, under floor boards, another building on your property, at your emergency bug out location or even a storage facility.
  7. Forgetting salt, cooking oil, shortening, baking powder, soda, yeast, and powdered eggs. You can’t cook even the most basic recipes without these items.
  8.  Not storing water to cook the food.  Many food storage meals require water to rehydrate.  Pasta, beans and soups all need water for cooking.
  9. Forgetting to store spices, salt, oil and basic condiments that are needed for your food storage. How will your famous spaghetti sauce taste without Italian seasoning, salt, olive oil and that pinch of sugar? Beans are a great staple to have on hand and can be seasoned in a variety of ways using salt, cumin, garlic powder, onion powder, soy sauce, ground red pepper and more.  
  10. Not having an alternative cooking source if the power goes out.   There are many alternative cooking sources such as the Kelly Kettle, Volcano Oven, Wonder Oven, Propane Camp Stove, Solar Oven and much more.  Research now to see which option is best for your family.
One last tip, don’t forget to store easy to prepare foods to help you get through on difficult days.  Even though they may not be on your list of required food storage foods, you may want to reconsider puddings, juice boxes, instant packaged foods, coffee, candy, muffin mixes, cake mixes, Hershey’s chocolate syrup (lasts a long time without refrigeration), brownie mix and other specialty comfort foods.
In this day and age, with the increase in gas and food prices, it pays to learn from seasoned prepper’s  mistakes.  Another words, learn from their past mistakes!

Saturday, May 27, 2017

How to Prepare on a Budget

It doesn’t require a fortune to prepare for the moment that it all collapses. In fact, it can take a lot less than you’d think as long as you’re smart about what types of things you’re stockpiling and willing to get a little creative when it comes to sourcing. We’ll show you how to get started on making sure you have the stocks you’ll need when it comes down to it, no matter what your budget might look like now.

The Boring Stuff-Making a Solid Budget

You should probably be doing this anyways, but you need to sit down and seriously break down your monthly expenses. There’s usually plenty of fat which can be trimmed away, but it’s up to each individual to decide what they need as compared to what they want.
Once you’ve done tallying this you’ll also need to break down your daily expenses on top of bills and figure out where you can trim and save there.
Depending on how long you’ve been at this, you might have some of what you need already or you might just be starting out. Once you have things laid out in a solid manner, you’ll also want to start making sure that you have some money to put into things each month.
Whether you’ve got your eye on a big capacity hunting backpack or just making sure that you have enough food and water to last at your bug out location you’ll have to make priorities.
Food and water should be top priority, including things like materials for traps and water purification devices. After that it’s up to you and your own plan to decide just how to proceed.

Know Where to Go Cheap

It’s a sad truth that in most arenas you’ll get what you pay for. This can range from mildly irritating to highly problematic and what you end up with is extremely personal.
There’s a few places where it’s never going to be a good idea to cheap out, however.

Don’t go cheap on the following:

Water Purification- This is a top priority and you want to make sure that you have multiple ways to do things. It’s especially important if you end up having to flee your location. Purchase something high-quality, and preferably with multiple methods of doing so.
Ammunition- A lot of people make the mistake of going cheap here. A lot more people can tell you horror stories about their AR jamming with cheap, aluminum rounds. Your weapons are your lifeline, a jam on the shooting rest is one thing but when your life is on the line it’s a truly terrifying prospect. This doesn’t mean you’ll want to buy gimmicky, expensive ammunition either, but surplus rounds with a price too good to be true are generally a bad idea.
Your Bug Out Bag-Hopefully you’ll never have to use it, but as traveler’s, hunters, and outdoorsmen of all types will tell you: having a bag break while you’re on the move sucks. It’ll also be a serious impediment to your survival and isn’t likely to be something you can quickly and easily replace while on the move.
Instead, you should look for cost cutting measures on more generic items. Spending excessive amounts of money on fancy cording or name-brand medical supplies is generally a waste for the amount of value you get.
Knives are particularly guilty of this. While that high-end ESEE might be a bit better, is it really worth twice the price of a USMC Ka-Bar? Cheap Kershaw folding knives might not hold up as well as a high-end Benchmade, but is the five-fold or more difference in cost worth it?
It’s all about value for the dollar. When you get past the initial cheap trash in many areas you’re looking at a decreasing return per dollar spent. What your budget is and how well you do your research will determine where your cut-off point is.
Food is another area where people tend to spend too much cash. Generic survival rations will keep just as well as name brands. As prepping has become a more common activity the usual suspects get involved, and it’s worth taking a second look at products specifically sold to preppers to make sure there’s actual value added beyond the marketing.

Learn to Love DIY

A lot of things can be made fairly simply at home, and in fact once your initial supplies begin to dwindle in a long-term situation you’ll end up doing it yourself.
Regardless of the amount of space you have, for instance, you can definitely can and bottle goods much more cheaply than you can buy them. You’ll also have valuable experience with preservation if the worst happens, as well as experience with growing your own crops. Kind of hard to beat being both cost-effective and learning a new skill in one blow.
Doing your own repairs around the house, especially while you still have internet access, is another example of something that will both cut costs and provide you with valuable skills that you may need in the future. There’s no better teacher than experience after all.
Knowing how to handle the basics of just about everything isn’t going to be beyond most people. Skills like flint knapping and bushcraft can be overlooked by preppers, but they come in handy on occasion even for casual hunters and outdoorsmen.
The more you do yourself, the better off you’ll be.

Wise Shopping

There are a lot of items which can be used for your stores which can be purchased at a fraction of the cost without spending the money on name brands. Things like rubbing alcohol and bandages, for instance, can often be purchased at dollar stores at a good price without breaking the bank.
Buying food items in bulk can also be a huge help. For nonperishables, you can even start to fit your normal eating and prepping budgets together, plus you’ll have experience using these kinds of foods to make something that’ll taste good as well as keep you alive.
This step largely boils down that that most exciting of hobbies: consumer research. This means that you’ll have to keep on top of things and keep an eye out for deals. Quit throwing away those coupons that come in the mail and give them a careful look over, you can find some pretty impressive deals.
This might also mean occasionally spending some extra money, if a good pair of boots is on sale, for instance, you might be better off buying a couple pairs. Rotate them to break them in and then stash the extra pair, this way you’ll know that you have something vital with extras.

Conclusion

As you can see, it doesn’t take a rich man to be prepared for a SHTF situation. If you’re on a limited budget, however, it may require a bit of research and a bit of sacrifice in order to make sure that you and your family are safe in the event the worst comes however. By making sure you’re on top of things now, however, you can also make sure that you avoid a whole lot of trouble in the future and that’s the important part.

Friday, May 26, 2017

Food Storage Basics Part 1; Preparing to Store

65a810bcbde64772163ba09b6cfd7adf
We all know our basic cost of living is increasing.  Despite the increase and the knowledge, at some point, we are going to be stuck at home with no way to get to the grocery store.  We just assume tomorrow will take care of itself, right?
What about when things get rough, whether it is after a natural disaster or some other unforeseen circumstance? Can you feed your family without running to the convenience store or the pizza parlor? If a giant light bulb has just went on and you want to know what you can do to prevent that tragic situation from happening, read on. I am going to help get you started on the road to a more prepared lifestyle. There is no time like the present to get started.
Let me clarify something first before you chalk this up to a person who is fretting over something that may never happen.  There are plenty of reasons you would want to have a nice food storage on hand.
*Unexpected guests show up and you need to make large quantities of food
         *Bulk buying is one way to save money
         *Preparing for a downturn in the family’s budget
Storing food is one thing, but storing the right food for your family is a totally different issue. I cannot hand you a list and tell you to go buy all of this and store it and your family will eat great. It does not work that way.
Only store what you eat regularly and what you eat now. Do not waste your time buying a case of sardines because they are on sale if your family refuses to eat them today. A shortage in your food supply is not going to be an instant notification for your taste buds to suddenly decide sardines are not so bad.  In fact, the situation is already going to be stressful enough; you do not want to add to it by trying to gag down a food you hate.
There is another very good reason you do not want to suddenly start introducing new foods to your family members, young and old. There is an actual medical condition known as appetite fatigue that can cause some nasty side effects.  Side effects you do not want to be dealing with in a situation where things are already bad. I am talking about nausea, diarrhea and vomiting.  Not a pretty picture.
Your first step is to make a plan.  Your plan is going to require some time and patience to put together.  This is not like putting together a simple grocery list.  You need to decide how much food you want to store.  By this I mean are you intending to keep a 1, 3, or 6-month supply of food?  The 3 month plan seems to be the place most people start. It is pretty basic and you can build it up as you go along.
Next, you need to think about what your family eats for breakfast, lunch and dinner everyday. You will need to include snacks as well. This may seem like a monstrous task, especially if you are having a hard time remembering what you had for breakfast this morning.
0f9180b735a3b1efbd1815892cbc9419Now that you are really getting excited about creating a food storage, let me give you a huge word of caution.  Do not go overboard with your buying.  Do not buy food because it is cheap and you assume your family will eat it if they have to. They probably won’t.  And you will probably skip over that particular item in your storage in favor of another and guess what? It gets old and goes bad.  All that food wasted!  Do not buy food just to buy it.
Let’s talk staples. Not staples to hold your paper together, staples as in food staples. (Usually includes: Rice, Flour, Wheat, Powdered Milk, Beans, Sugars, Oatmeal’s.)  Now it is time to figure out what food staples you will need to include in your supply. Your staples are not going to be the same as mine. Our families are not identical.
If you are still struggling to get your head around the fact you are going to need to learn some basic cooking skills, it is really time to get motivated. If you do not have power, you are not going to be able to nuke one of those instant meals. You must learn how to use your food staples to create a meal–from scratch. I know you may not like it, but not eating is a lot worse than learning how to cook.
I want to help you get everything your family needs in case of an emergency or any reason that would limit the family’s food supply.  It is time to really get down to brass tacks, or in this case, the flour and salt.   Every menu item you have listed has an ingredient list.  It is time to make a list of each ingredient, and I mean every little thing including the dash of salt and the sprinkle of water.
This may seem like an impossible task, but there are plenty of ingredient planners you can use to help make it a little more manageable. While you are making your list, you also need to consider things like oil for frying or bread crumbs for breaded foods.  It is hard to remember all those tiny details when the dash of salt or pepper is just always in the kitchen.  You may not have that luxury in an emergency.  It is imperative you pay attention to detail today or all that food you are storing is essentially useless.
The beauty of taking the time to make an ingredient lists is so that you have enough of your staple ingredients. You don’t want to have an overabundance of just flour but run out of yeast. Nor do you want to have all sugar but not enough salt. Storing staple ingredients is important, but knowing exactly where those ingredients will go is even more important.
You may be looking at your list of ingredients and be feeling a bit overwhelmed. That fabulous list you have will do you no good if you do not know how much of each ingredient you need. It truly is pretty simple math. We are working with the idea you are planning a 3-month food storage. So, 3 months is 12-15 weeks. We are going to assume you are using said ingredient once a week. So the amount of the ingredient needed for the recipe multiplied by 12 and voila! You have the amount you need for your 3-month storage.
Let’s do a little practice run together.
  • Your family will use one cup of peanut butter for sandwiches in a given week. They also like peanut butter cookies as a snack, which is another cup during the week. We have established your family needs 2 cups of peanut butter each week.
  • Use your formula. 2 X 12=24 cups of peanut butter for a 3-month supply
  • One cup is equal to 8 ounces. 8 ounces x 24(the number of cups of peanut butter) =192 ounces
  • A standard jar of peanut butter contains 28 ounces. 192 divided by 28= 6.8. Therefore, you will need 7 jars of peanut butter to keep your family happy for 3 months.
 See! That was not so bad. Now that you know how much you actually need, you can skip the giant tub of peanut butter that seemed like such a good deal. You need to apply this formula to each ingredient on your list.
Now that we have went through all of that, I will tell you the easy, yet somewhat expensive way around all of this math and work. You can order freeze-dried or dehydrated meals that are completely whole. All you do is add water. Not only is this option significantly more expensive, it is really not ideal for your pantry rotation.
While most of these meals are actually pretty palatable, they are probably not going to be the first thing you or your family goes for when they are looking for dinner. If they sit on your shelf without being used, they will expire, and you will have wasted a lot of money.
Since there is so much to consider with long term food storage, this topic is part 1 of a series of articles on food storage. I hope that you will enjoy them and they will be very helpful to your food storage efforts.

Wednesday, May 24, 2017

How Does Your Garden Grow? Sunlight, Water, and Some Technology

In theory, growing a garden seems like the easiest thing in the world to do. Just sow some seeds, make sure the seedlings get plenty of water and sunlight, and in a few months (or less) you’ll have a bountiful harvest of fresh produce.
Of course, anyone who has ever grown a garden knows that it’s not really that simple. An infinite number of factors can affect how well your plants grow and how much food they produce, from how much water they get to the average temperature over the summer. Of course, there are always the human factors to consider, such as remembering to water the plants and pulling the weeds. It’s all enough to make most people hit up the market or the farm stand to buy produce, rather than go to all the trouble to growing it.
However, commercially grown produce isn’t guaranteed to always be widely available, and there are legitimate concerns about the safety and sustainability of those products. Not to mention, for those who wish to grow their own food, the climate can present a significant obstacle. Thanks to technology, though, all these obstacles can be overcome.

Bringing Tech Into the Garden

Sensor technology is taking over virtually every aspect of our lives — and gardening is no different. Embedded chips and an internet connection can take a lot of the guesswork out of growing your garden, telling you exactly what’s happening out there and what you need to do, and even keeping pesky critters out of your plants to ensure that you actually have something to harvest.
Gardening technology ranges from simple apps that tell you exactly when to plant specific crops to fully computerized greenhouses that ensure perfect growing conditions at all times, and everything in between.
For example:
  • A new generation of garden stakes include sensors that will send information about soil, light, and moisture conditions directly to your smartphone, so you know when to water and feed your plants — and whether they are getting enough sunlight or not.
  • The idea of timed sprinklers is nothing new, but gardeners now have the option of using sensor-controlled watering systems that monitor real-time weather conditions via the internet as well as soil moisture levels to deliver water when necessary. This prevents both under-watering, as well as the issue of sprinklers or irrigation systems turning on unnecessarily — such as in the middle of a rainstorm.
  • Home gardeners have the option of growing plants without soil using consumer-sized hydroponic systems. From smaller models that fit on a sunny countertop, to larger setups that take advantage of vertical space and use either natural or fluorescent lights, the idea of growing larger plants in less space is very appealing to many gardeners.
  • Keeping animals out of the garden is a challenge for any farmer, but sensor technology is helping with that as well. Several different systems offer everything from a blast of water to harmless wireless fences that keep deer away, ensuring that your carrots and tomatoes won’t become a feast for woodland creatures.

Getting Started With a High-Tech Garden

The first thing to remember when incorporating technology into your garden is that you don’t want to rely on technology to replace you and the work that goes into a successful crop. Technology is a tool that can help you avoid certain common issues, but it should not replace your own real-world observations and care for your plants. In other words, you’re still going to have to remove the weeds yourself.
That being said, the best way to get started on a technology-enhanced garden is to begin with a sensor system that helps you tackle your biggest weakness. Since the majority of plants fail due to over or under watering, a sensor that helps you determine when and how much water to give your plants is a good starting place.
Or, if you live in an area where the growing season is short, a greenhouse might be a good option to help you expand your options. With a technologically advanced greenhouse, you can experiment with different crops as well, combining the data you collect from sensors with your own observations to create a garden plan that works for your needs.
Few things in life rival the pleasure of growing your own food right in your backyard. Incorporating technology can help that be a more successful endeavor, while also increasing yields and reducing the amount of time and money you spend cultivating your plants.

Sunday, May 21, 2017

3 Ways to Use Your Swimming Pool for Emergency Preparedness

There are plenty of warnings not to drink pool water, but would the same advice still apply in an emergency situation? The fact is pool water is not potable and contains many different chemicals, but despite all that, a swimming pool is one of the best things to own during an emergency. The average 20 ft by 40 ft inground swimming pool can provide access to up to 34,000 gallons of water at a time when getting it from the tap or well may not be feasible. Here’s how to prepare to use this valuable resource in a SHTF scenario.
Use Pool Water as Gray Water
Pools contain chlorine to keep them pristine, but when the electricity goes down and the pumps stop running, the automatic filtration and treatment system stops too. That can be a good thing as chlorine dissipates over time into the air. Thus, there is less and less of it. You may even notice algae starting to grow, which is also a beneficial sign that the chlorine is about gone. Then, you can use the water as gray water to do laundry, flush toilets, and take baths. The amount of water you use from the pool can keep your potable water stores from being wasted and used on those activities that do not require the absolute best filtration or water treatment. 
To Stay Cool in Hot Situations
One of the most dangerous times for the power to go down is in the heat of summer. Luckily, if you own a pool, you won’t be one of those people who might end up with heat stroke. A pool isn’t just handy for jumping into when the temperatures get too high, but it can also be used for 12V battery-operated evaporative coolers, so you can sleep well at night. You can opt for the DIY option of a swamp coolers which works by cooling very dry areas down by spritzing water on them. However, there are also battery-operated swamp coolers on the market. Evaporative cooling is an ancient technique to keep buildings cool, and if you have an area with brick, you can even spray water on it and let the natural evaporation cool that space down. 
You Can Drink It (With Some Cautions)
You probably are very aware what goes into your pool water, when it comes to additives and chemicals. Many pool builders might even be creating salt water pools for the neighbors or treating them with heavy metals, though. Thus, you might not know exactly what is in everyone’s pools, but you do know your own. It will need to be filtered and protected, to try to maintain some of the chlorine to avoid contamination. Cover your pool with a cover at the first indication that you are undergoing a long-term emergency. This will not only keep the sun from breaking down all the chlorine, but it will also keep debris out of the water. Use a swimming pool test kit to check the chlorine levels and once it goes below 4 ppm, it is safe to drink(assuming no other harsh chemicals are in it). You will still want to use a biofilter to remove any potential bacteria and additional chemicals before giving it a swig. If you have access to a solar still, this is the best way to treat pool water before drinking it. Do not drink pool water for more than a few days, just in case you’ve missed something. Also, don’t drink pool water from a different person’s pool because they might not know how it’s been treated and what is in the water. If you decide to build your own pool, you can run a quick search of “pool builders near me“ and ask for information regarding pool water as well as what designs best fit you.
Get Your Own Pool for Emergencies
Having your own pool is the best assurance of what goes into the water prior to an emergency. In the event of an emergency, you don’t want to rely on the kindness of your neighbors to offer up some of their pool water and then find out it has been harshly treated with too many chemicals or salts to make it drinkable. Instead, treat your pool with chlorine and have a plan to protect it and use it appropriately when the time comes.

Thursday, May 18, 2017

What Makes for a Great Hiking Boot?

Choosing the best hiking boots is essential for your hiking experience. You want to stay comfortable, safe and dry while you are exploring new trails and spending time in the wilderness. In order to find the most appropriate hiking boots, you must first consider when and where you are planning to hike, the terrain, the weather, the distance as well as the weight of your backpack. Also, getting a proper fit and the break in time are other key factors to keep in mind when shopping for hiking boots.
First of all, choose between the various types of hiking boots available, including: trail shoes, light or backpacking hiking boots or heavy duty boots for mountaineering.
  • Hiking shoes are the lightest options. They have good traction and provide moderate support and cushioning. Suitable for shorter trails, good weather, a mild terrain with slight elevation, these shoes can be worn as casual wear as well.
  • The light hiking boots are also pretty lightweight but provide more support than the trail shoes. They are suitable for good terrains and moderate elevation. Great for good weather, these boots can dry quickly and are breathable. No break in time is needed for the light hiking boots.
  • Backpacking boots or hiking boots are heavier and more durable. They are usually made of waterproof full grain leather, and provide reliable support on rougher terrains and when carrying heavy backpacks. They are good for snow and bad weather as well as for rougher terrains. Durable and cushioned, these boots have good traction and will keep your feet dry and warm. 
  • Last but not least, mountaineering boots are the most durable, heavy duty option of them all. They provide maximum ankle protection. Their thick and stiff soles are superb for very difficult terrains and for big elevations and climbing. Waterproof and insulated, they are an excellent option if you are planning on doing winter hiking. They are heavy and stiff and are not the best choice for day hikes in normal conditions and terrains.
    Offering maximum support and foot protection, mountaineering boots are extremely durable and provide the best ankle protection. These boots have thick, stiff soles designed for difficult mountain topography and significant elevation gain. Most boots in this category are waterproof, and some include insulation to protect feet in cold, windy and wet conditions. If you don’t know what to look for in the top winter boots, check this article by My Bootprint. Many mountaineering boots are compatible with crampons, which makes them suitable for traversing ice and snowpack. Although these boots are excellent for mountaineering, they are probably overkill for most day hikes.
    The soles of your hiking boots are also very important. First of all, look at the construction of the hiking boot – are the soles stitched or are they cemented to the upper and the midsole. The boots which have a Goodyear welt construction have the strongest and most durable construction and can be resoled. The cement construction wears quicker but is a cheaper option. The outsole must provide sufficient traction and be made of a durable material. Real gum rubber soles are an excellent choice due to the fact that they are durable, provide superb traction and are semitransparent, brown or white.
    With all types of hiking footwear, durability and foot protection is always a high priority. Remember, hiking shoes are not travel shoes. For this reason, hiking footwear is crafted of more rugged materials than casual shoes. The tougher the construction, the more break-in time will be required.
    Another factor to consider when buying hiking boots is the material of the upper. You can choose between full grain leather, split grain leather, nylon and suede. The fist type, the full grain leather boots are the most durable and weather resistant of them all. They are also usually the most expensive ones. They do need break in time, so you must make sure they are properly broken in before wearing them when going hiking.
    The other three types of materials are lighter and moderately durable. They are often paired with mesh materials to provide breathability. They are great for casual hiking. They usually require little or no break in time.
    You will need to choose the height of your hiking boots too. Taller hiking boots provide more support and are more suitable for rougher terrains and heavy backpacks. Hiking shoes and mid cut boots are more suitable for shorter trails and easy to moderate terrain. The high cut boots provide superior support and cover the ankles. They need the longest break in time, but are the best choice for difficult and steep trails.
    One last thing: boots are rarely comfortable right out of the box. Don’t forget to break in your new boots to avoid the pain and discomfort.
    So, already you should have a pretty good idea what to look for in a good hiking boot. Now get your new boots on and happy hiking!

Monday, May 15, 2017

Building a Remotely Located Bunker for Your Family


Disasters cannot be predicted but we definitely are starting to find out ways to stay protected if one does happen. We have in-house safe rooms, basements doubling up as bunkers, food and medical supplies, bug out bags and a whole lot of other things that provide us with a sense of safety and calmness.
But what most of us miss out when thinking about prepping is that most of our homes lie in urban settlements or places where there is human agglomeration all round. In the event of a calamity that requires us to evacuate our area, we do have the stuff to survive the ordeal but most of us do not have a safe place to stay if things get out of hand and we cannot return to our homes safely. 
Owning a remotely located bunker is one preparedness idea that doesn’t get its due attention despite its immense importance. Bunkers protect us from outside threats and yes, we do need them inside our homes, but there should be a place far away from the area we live, where we should have one to save ourselves if such things like terrorists attacking the city, nuclear fallout like Chernobyl or even a natural disaster. Evacuating out of the area takes a lot of time which might end up forsaking the lives of those who do not pass first. So owning a remotely located bunker is becoming increasingly important and in case you also are interested in acquiring and building such an essential safety measure for your family then you need to follow these steps: 
Choosing a location:
A wise decision for choosing a location to build a remote and safe bunker would be in the direction opposite to the evacuation exits out of the area as in the event of a calamity or a catastrophe, everyone going out will use the other way and your path to the bunker would be highly accessible at all times. Secondly, there comes the notion of how far should it be located from any urban dwelling or area? Well, that depends on you but choose a place that’s no more than half an hour’s drive away from the precincts of the city, town or area you reside in as you would need to get there as soon as possible. 
Thirdly, choose a place that’s non-descript and no one would ever think that someone would come and live here. Vast scants of land are always available outside cities that growing population won’t touch for the next few decades. Settle down in a certain area and then find the authority in control of it. Buying might be a bit expensive and could take up a couple of thousand dollars but the money will be an investment and could end up increasing your family’s chances of surviving a disaster like a sudden nuclear fallout from the one that happened in Chernobyl or an ash splurging volcano and there are a few ways to fund and save money for your doomsday bunker. Forests and natural reserves should be avoided to build a remotely located bunker as they are subject to a lot of complex rules and the park ranger’s discretion over everything might make reaching the location a difficulty most of the year. 
Building it:
While you might think that this remote bunker would be similar to building a bunker inside your home, but this bunker has an altogether different purpose, therefore its dynamics would be drastically different from the latter. 
Firstly, this bunker should be quite big and not just function as a small room to keep you and your family locked out till things get better outside. This bunker should be spacious as you might need to spend time ranging from a few weeks to even a month or two inside it as it’s meant for the more mean disasters, which usually don’t subside within a day or two. Even if you opt for a single hall, make sure it’s big enough to have space to have a small stroll and can easily put to rest 10-15 people without cramping up the place. 
While reinforcement is necessary on the walls and the roof, it’s advisable that you start building the roof 2-3 meters below ground level so that the mud and earth above you could provide you with an extra cushion and make the place more safer. While there is a lot of stuff out there on prepping foods and equipment that you might need to stay healthy down there for long periods, ensure that there is a lot of water and the sanitation is great to make the ordeal as comfortable as possible. 
Hiding it:
Yes, you need to hide it from everyone passing through. It should not be visible from above the ground and there should be no sign that might lead anyone to know that a place like this exists in the first place. 
Firstly, to erase signs and traces, you would need to put in the exhausts in such a manner that the emissions match the outside air at all times so no one can trace you through heat signals in times of terror or war. Secondly, the reason that the place should be built a good 2-3 meters below ground level is to eliminate radio signals emanating from any activity you do down there and not let anyone find out that there is something suspicious down there. 
Thirdly comes securing the outside. The entrance should be secured through a formidable lock system but you need to make sure that no one except you can find it out. The best way to do this is to put it under a layer of something like bringing in a used dump truck half full of compost and offloading it there. Then get some wild shrubs and plants and try to plant it in a manner that makes it look as natural as possible. Wild plants neutralize suspicion to a certain extent and any “Intentional” activity that could turn out to give away your bunker’s location might be immensely dangerous. 
Prepping is a formidable activity that might have remote chances of coming into use but it can turn out to be lifesaving if such a situation arises. A human life is invaluable but as we spend on our materialistic desires and retirement plans, saving to build a place that might end up protecting us from harm is not such a bad idea. Lastly, prepare a map and some instructions on how to operate things down there and leave them secured so that even your future generations might benefit from them when unknown forms of disaster might threaten them. This underground Noah’s ark might be your savior from a great deluge or a modern strike.

Friday, May 12, 2017

3 Disaster Mitigation Items all Households Should Have

shutterstock_136621700Natural disasters are not only becoming more frequent, but more deadly. In 2011, there were 553 deaths in the U.S. as a result of tornadoes, which was more than 2001 to 2010 combined, according to the National Oceanic and Atmospheric Association. The Oklahoma Insurance Department estimated damages from the 2013 tornado which destroyed the town of Moore to be over $2 billion. The New York Daily News estimated total damages caused by Hurricane Irene in 2011 to be well over $15 billion.
Preparation is key to mitigate damage, potentially save the lives of your family and salvage your home and belongings. These three items are must-haves for anyone serious about disaster preparedness.

1. Generator

A generator will be essential for short-term preservation, and will be a source of electricity for your most essential electrical items. The size and power of the generator you choose all depends on what you need it to power, so start by purchasing a Kill-A-Watt meter. These devices allow you to plug any electrical device into it and get a reading for the amount of power required. Most people want to keep their refrigerator and freezer running, along with some lights for day-to-day activities. Add up the total wattage of all the appliances and devices you would want to run during a power outage, and that will give you an idea of the size of generator your home will need.
The average American home uses about 3,000 watt of power per day, according to the U.S. Energy Information Administration, so a 2000-watt unit should suffice for a refrigerator, lights, and even to charge cell phones and computers. A larger unit will be necessary if you want your home to have the same power capabilities no matter the situation. If you’d like to test before you buy, consider renting a generator from Sunbelt Rentals and conducting a trial run in your home. Keep in mind, the larger the generator, the more fuel it will need to run.

2. Propane Heaters

There are several options for propane heaters on the market, but the Mr. Heater line makes units specifically for indoor use. The Big Buddy model will heat an area up to 400 square feet for well over 24 hours on two of the little green one-pound propane tanks. You can also connect a large 20-pound tank to the unit for extended use.
Despite Mr. Heater building these units for indoor use, some precautions still need to be taken. Carbon monoxide is odorless and can be deadly in minutes when oxygen levels in the room are too low. A cheap carbon monoxide detector should be utilized any time propane is burned indoors. Its also best to leave windows cracked slightly for ventilation. Place the CO detector near your sleeping quarters if you choose to sleep with the heaters running.
These units are also ideal to keep water pipes from bursting as a result of freezing, which can prevent thousands of dollars in damage.

3. Life Straws

Humans may be able to survive a few weeks without food, but they can only live about three days without water. Life Straws can clean harmful bacteria, protozoa, and other microbes from dirty water to make it drinkable. Thus you’ll be able to drink water from any source without the fear of contracting a waterborne illness.
There are anecdotal accounts of individuals filtering their own urine through Lifestraws and sustaining themselves. The filters will not remove the salts and other less harmful impurities, so the resulting water will likely not taste very good. Still, in a survival situation, it could save your life. The Hydro Photon SteriPEN and the MSR Miniworks EX are two more options to consider for quick and portable water purification.
Survival is possible in any situation with the basic tools. This foundation of essentials will provide you with the chance to continue long-term once the smoke clears.

Tuesday, May 9, 2017

Fly Fishing Tips

Fly fishing is an enjoyable activity. Besides, I sincerely believe it’s a good skill to have for preppers and survivalists. While it’s definitely not as cool as learning how to shoot with a rifle but it’s pretty practical. Fly fishing can provide a stable source of food and it’s comparatively easier compared to hunting.
With years of experience in fly fishing as well as the tips and advises other expert fly fishers shared with me, I can share a few efficient fly fishing tips with you.

Know the common fly fishing terminology.

This by itself wouldn’t help you learn or improve your fly fishing skills (though it has tons of indirect benefits). First of all, fly fishing like any other things has special terms that the community tends to refer. Just take SHTF (Shit Hit The Fan) for example, it’s a common term survivalists use to illustrate a catastrophic situation. Knowing these terms help you understand the subject better (in this case it’s fly fishing) and allow you to communicate with people of the same interest.
So here are some common terminology to understand. The end section of the rod where you hold on is the butt. The round elongated metal things that stick out are guides. rear-most guides, (one or two which is a function of the weight of the rod,) are stripping guides. The remaining guide are called snake guides – the highest one is referred as tip top.
The reel is fit on the rod at the reel seat. The reel is hung down under the rod. One of the feet which is on the reel slides into an opening in the reel seat. There will be a piece of metal which slides over the other foot of the reel and attaches the reel on the rod butt. It may come from the top of the reel seat, which is known as down-locking, or come up from the base of the reel seat, which is called up-locking.

Know where the fish are.

In the recent fly fishing expert roundup I did, one of the common tips these expert preach is to know where the fish are. This is something you will get better over time. I have some tips for you though.
Areas around a stream that meet these 3 conditions will tend to have the most fish. They are shelter, food and low current. It could be around some big rocks where the stream current is low giving the fish a place to rest and feed. The rocks also act as shelters which provide protection.
Note: Fish tend to hang around low current areas as they don’t need to expend huge amount of energy.
These days, finding fish is a lot easier though. You can use a fish finder device which basically detects where the fish are using ultrasound technology.

Know and Learn about your reel.

Learn how to disassemble, take it apart, change the spools or cassettes quickly, easily and comfortably. Ensure that inside of each spool, including spares, is marked as to what each line is.
Also, it’s important to know where the drag adjustment is and how to adjust it to suit specific situations. Setting the right drag adjustment for your fishing reel is crucial as it will prevent the line from breaking.
There are no hard and fast rules here. The optimal drag adjustment will be different across different waters and fishes you are after.

String the Line to your rod properly.

This is one of the common mistakes I see many beginners make. They are either careless or don’t know how they should attach the line to their rod properly.
Here is how you should do it. Once you attach the reel, you should pull off some line. Fold the fly line over with the rod butt on the ground with the handle of the reel facing upwards. Move along the rod and run the folded line through each guide. Check to ensure that you haven’t missed any.
Note: The tiny metal loop very close to the butt is not a guide, it’s just to hook your fly when you are not fishing.
Learn to tie some basic knots.
You don’t need to learn all the different kinds of knots to be good at fly fishing. Master some basics one like the Surgeons, clinch and improved clinch knots are good enough to get you started.
There are many Youtube Videos out there that will guide you step-by-step. It’s important to practice tying these knots if you want to be somewhat good at it.

Figure out which kind of grip you will use.

We personally advice and prefer to teach our students, to hand the crank of the reel by the left hand, but if you are left-handed use your right hand.
When casting the line, the hand you use doesn’t really matter but when it comes to playing and landing a fish you want to use your strongest hand to increase your odds. Since it’s obvious you wouldn’t want to switch hands in the midst of the process, it’s best to do everything right from the start.

Be appropriately dressed.

There are a few important things to note when it comes to dressing. First of all, you don’t want to wear attires with bright colors simply because it’s easily visible above the water. It’s advisable to pick colors that are similar to the surroundings which acts like a camouflage.
Secondly, you just have to be comfortable. Don’t pick attires that looks great but restrict movements. Some examples I can think of right now are tight shirts and jeans that prevents your hands and legs from moving freely.
Also, make sure you wear a pair of polarized sunglasses especially if you are fly fishing on sunny seasons. Polarized sunglasses enable you to look at the trouts and fishes below the water clearly.

Conclusion

Hopefully the tips shared above will help you become a better and more efficient fly fisherman. If you are really interested in learning more about fly fishing, here are some more resources that are completely free to get started.